
Connect an AI assistant via MCP
Goal
Ask about your campaigns and change their settings right in a chat with an AI assistant. For example: "Show spend by campaign for the last week" or "Block zones with CTR below 0.2% in campaign 1040". The assistant connects to the platform via MCP and acts on behalf of your account with the permissions you grant it.
For your own scripts, CRM or BI, use an API token instead of an assistant.
Before you start
- An AI assistant that can connect remote MCP servers with OAuth authorization: Claude, ChatGPT, Codex, VS Code, Antigravity or another one. Check the assistant's help to see whether your plan includes this.
- An advertiser account. The assistant gets access only to what this account can access.
- Access to the account settings: connected assistants are listed on the Integrations tab, and you can revoke access there too.
Steps
In the assistant, add an MCP server with this address:
texthttps://advert-cabinet.youtarget.com/mcp/The assistant registers itself on the platform: you do not need to enter a client ID or keys. Where to add the server, see Claude, ChatGPT, Codex, VS Code and Antigravity below.
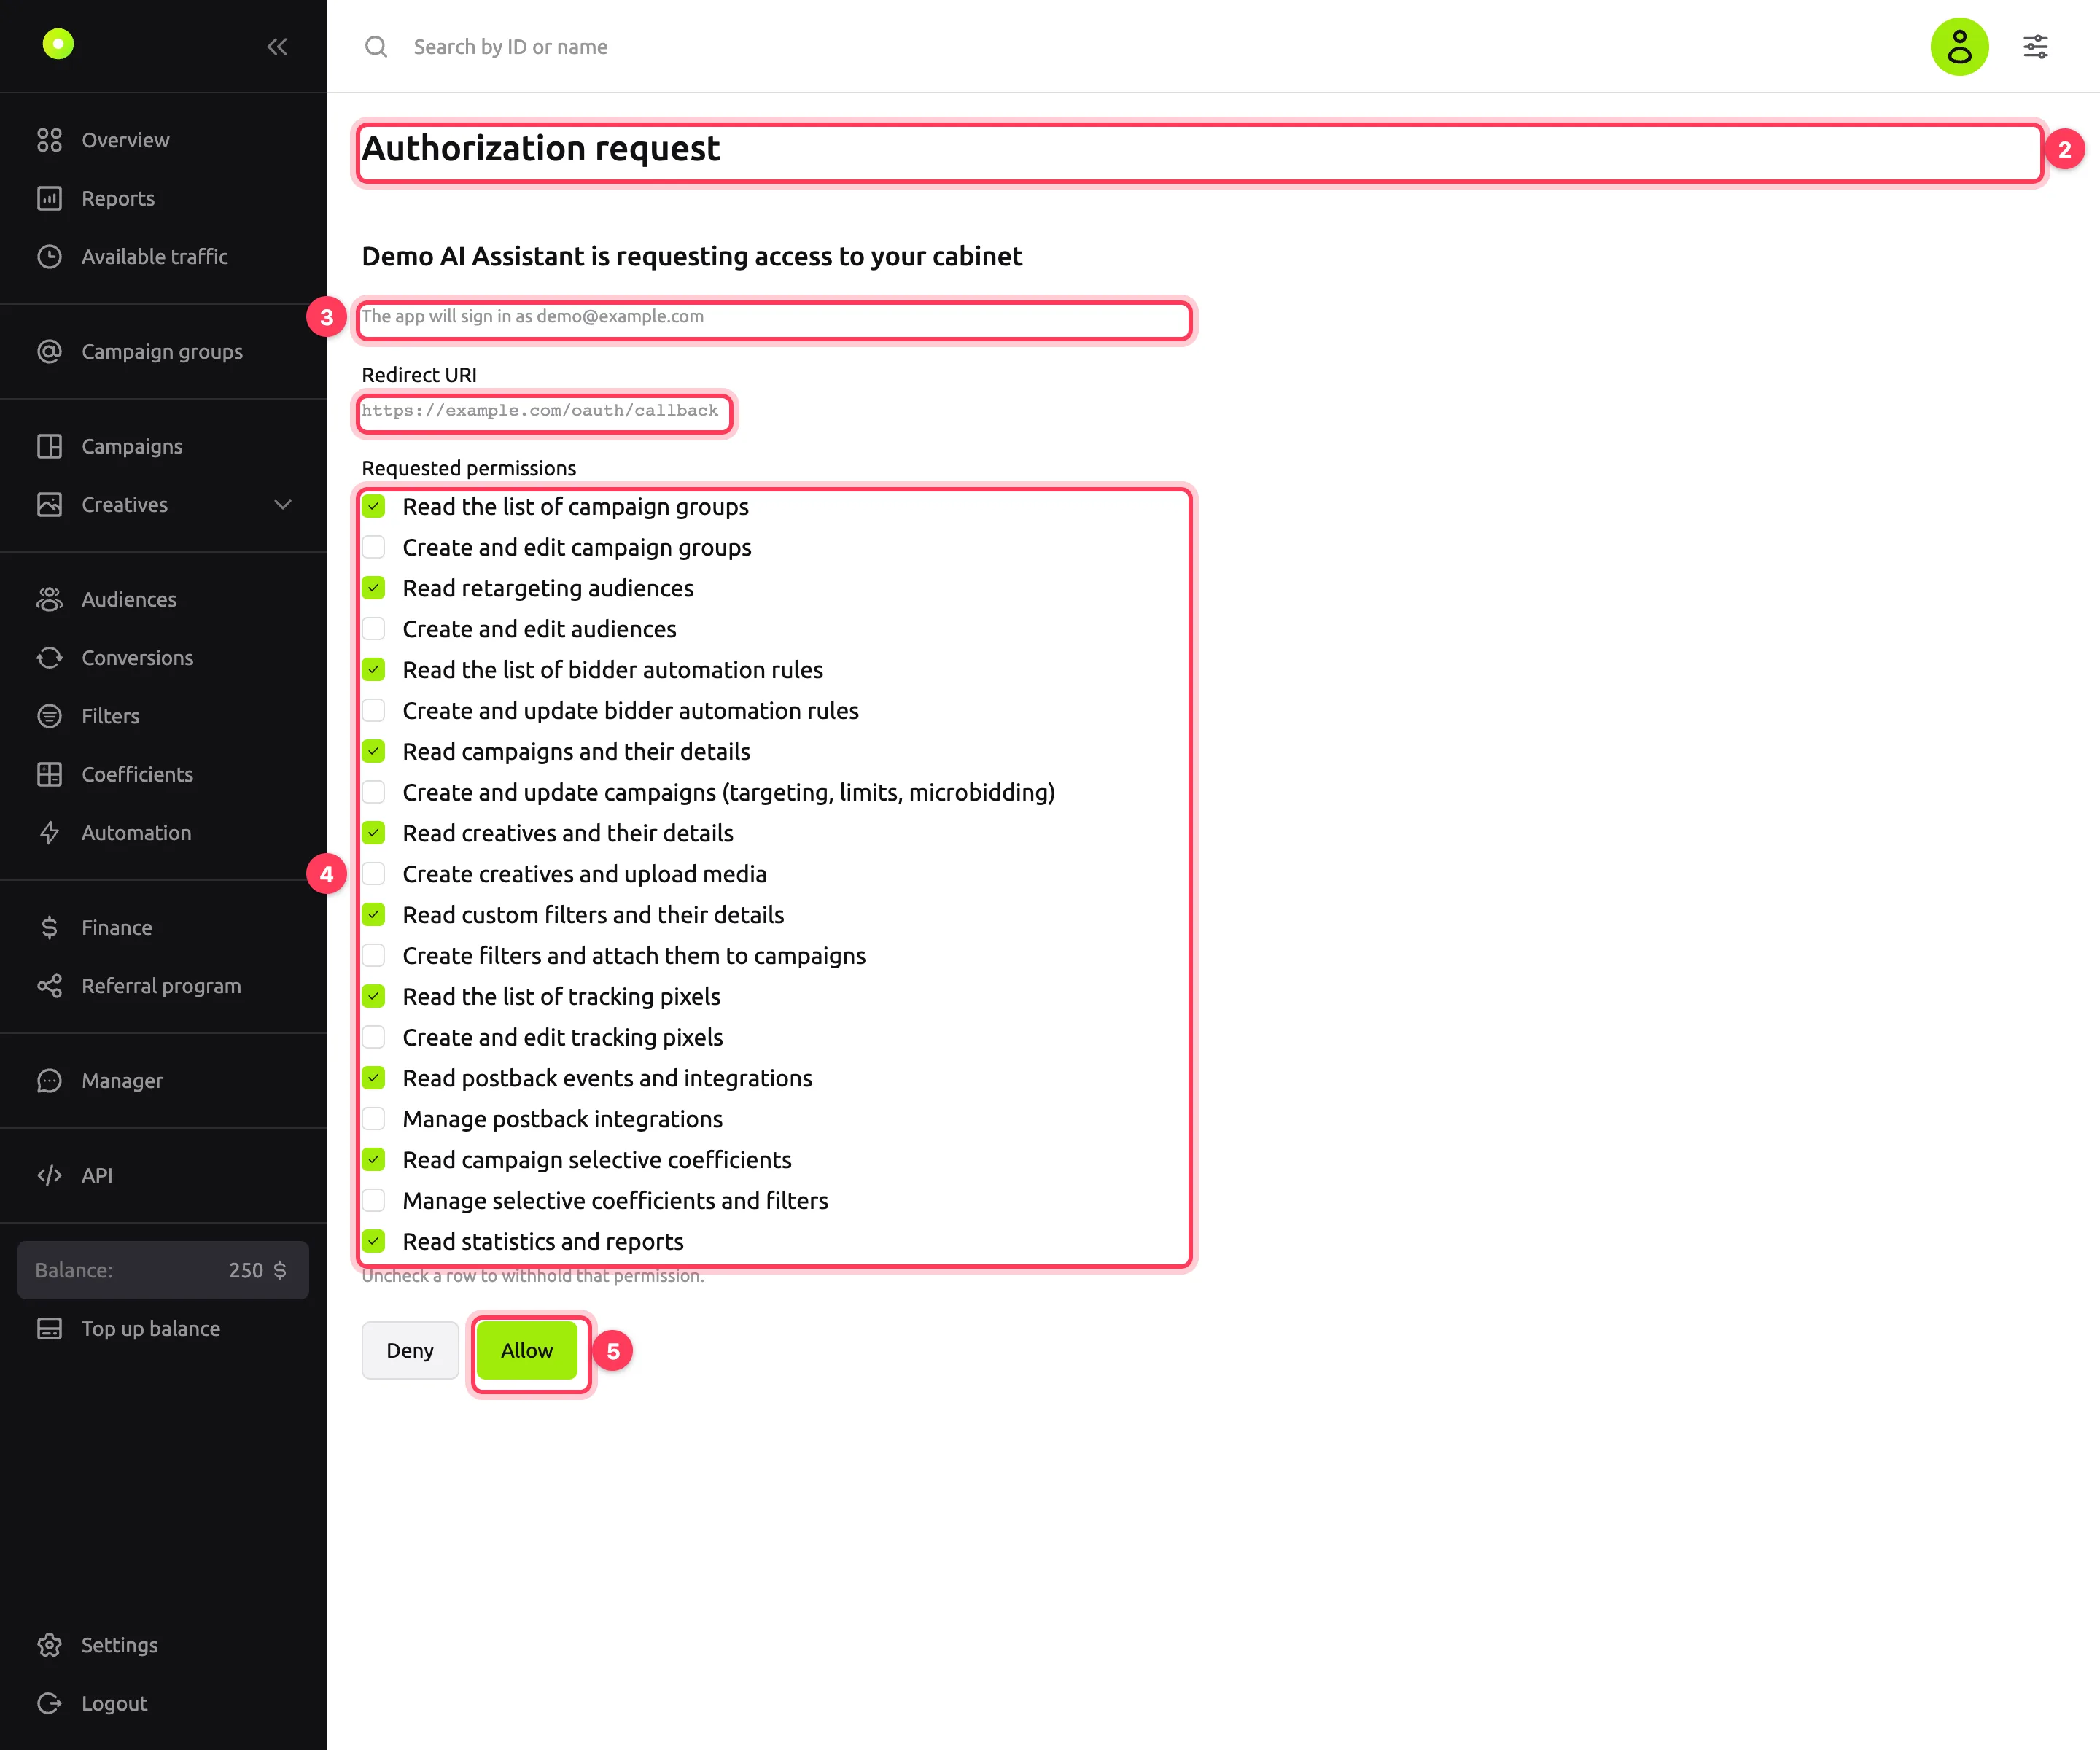
Start the connection in the assistant. It opens the Authorization request page of the dashboard in your browser. If you are not signed in to the dashboard, sign in: the page opens again after sign-in.
Check who is requesting access and for which account. The heading shows the assistant's name, and below it is the email of the account it will connect to. The Redirect URI field shows where the dashboard will send you after you allow or deny access: it must belong to your assistant. If the assistant runs on your computer, like Claude Code, Codex or VS Code, the address looks like
http://localhost:…orhttp://127.0.0.1:…, and that is fine. If the account is wrong, sign out of the dashboard and start the connection again. If you do not recognize the assistant or the address, click Deny: the assistant does not get access.In the Requested permissions list, clear the checkboxes for permissions you do not want to grant. For example, keep only the read permissions: the assistant will be able to view data but not change anything. The list shows permission descriptions rather than codes, and these descriptions are in Russian: read permissions start with the word «Чтение» (Read).
Click Allow. The dashboard grants access to the assistant and returns you to it.
Ask the assistant to show your campaigns, for example: "Show my active campaigns". If it replies with a list of campaigns from your account, the connection works.
Claude
Claude on the web and Claude Desktop. Open Customize → Connectors, click + Add → Add custom connector. Enter a name, for example "Youtarget", and the server address, then click Continue. Under Authentication, select Sign in now, and under OAuth client, select Register automatically: the platform does not support Use Claude's published identity. Click Add: the Authorization request page of the dashboard opens.
In a chat, turn the connector on with the + button → Connectors. On the free plan, you can add one custom connector. On Team and Enterprise plans, an organization owner adds the connector in Organization settings → Connectors, and each member connects it in Customize → Connectors with the Connect button. You cannot add a connector in the mobile app, but a connector added on the web or in Claude Desktop works there.
Claude Code. Add the server with this command:
claude mcp add --transport http --scope user youtarget https://advert-cabinet.youtarget.com/mcp/--scope user makes the server available in all projects. Then type /mcp in Claude Code, select youtarget and start authorization.
ChatGPT
You can add your own MCP server only on the ChatGPT website and only on a paid plan. In Business and Enterprise workspaces, an admin can turn this off.
Open the plugins page (chatgpt.com/plugins), click + → Add custom MCP server. Enter a name and put the server address in the Server URL field. In the authentication settings, select OAuth. Read the warning, click I understand and want to continue, then Create as a plugin. Install the plugin you created: the Authorization request page of the dashboard opens when it connects.
By default, ChatGPT asks for confirmation before each action that changes data.
Codex
Codex CLI and the Codex extension for code editors share their settings, so you add the server once:
codex mcp add youtarget --url https://advert-cabinet.youtarget.com/mcp/Codex detects that the server requires authorization and opens the Authorization request page of the dashboard in your browser. If the page did not open or you closed it, start authorization again:
codex mcp login youtargetIf Codex runs on a remote machine without a browser, run codex mcp login youtarget --no-browser: Codex shows a link. Open it on your computer and allow access. The dashboard sends you to an http://127.0.0.1:… page that does not load, and that is fine: copy its address from the address bar and paste it into Codex.
Codex requests all permissions available on the platform. On the Authorization request page, clear the ones you do not need.
VS Code
In VS Code, MCP servers work in GitHub Copilot Chat in Agent mode. Open the Command Palette (Cmd+Shift+P or Ctrl+Shift+P), run MCP: Add Server... and select HTTP (HTTP or Server-Sent Events). Enter the server address, then a name, for example youtarget, and select Global to make the server available in all projects.
You can also use the command line:
code --add-mcp '{"name":"youtarget","type":"http","url":"https://advert-cabinet.youtarget.com/mcp/"}'If VS Code asks Trust and run MCP server youtarget?, click Trust. VS Code then says that the server wants to authenticate: click Allow, and the Authorization request page of the dashboard opens. If the code command opens Cursor on your computer, reinstall it from VS Code: Command Palette → Shell Command: Install 'code' command in PATH.
Antigravity
Antigravity is Google's development environment and CLI with an AI agent. It replaced Gemini CLI for personal accounts. Add the server to ~/.gemini/config/mcp_config.json:
{
  "mcpServers": {
    "youtarget": {
      "serverUrl": "https://advert-cabinet.youtarget.com/mcp/"
    }
  }
}
The agy mcp add youtarget https://advert-cabinet.youtarget.com/mcp/ command does the same. Then in the Antigravity app, open Customizations → Installed and under MCP Servers click Authenticate next to the server. Allow access on the dashboard page, copy the authorization code, paste it into the Enter authorization code field and click Submit.
Result
The assistant answers questions about campaigns, creatives and statistics. If you granted write permissions, it changes settings at your request.
The connection appears in Settings on the Integrations tab, in the OAuth applications block. The Scopes column lists the permissions the assistant received.
What the assistant can do
Permissions come in pairs: read (…:read) and write (…:write). A task that spans sections needs permissions for both sections: for example, to turn off creatives based on statistics, the assistant needs stat:read and creatives:write.
| Section | Permissions | What the assistant can do | Example request |
|---|---|---|---|
| Campaigns | campaigns:read, campaigns:write | Read: the campaign list, settings, targeting, limits and schedule, micro-bidding, the campaign's retargeting audiences, geo, device, browser and format dictionaries. Write: create a campaign, change settings, targeting and limits, attach audiences, start, stop, archive | "Stop campaigns 1038 and 1039", "What is the daily limit of campaign 1040?" |
| Campaign groupsA folder for one advertiser's campaigns with shared settings and limits. | advertisers:read, advertisers:write | View, create and change campaign groups | "Which group is campaign 1041 in?" |
| Creatives | creatives:read, creatives:write | Read: the list and details of creatives of all formats. Write: create and change a creative, turn it on or off, archive | "Turn off creatives in campaign 1040 with CTR below 0.1% for the week" |
| Statistics | stat:read | Read only: a report with nested groupings by campaigns, zones, creatives, geo and devices, period comparison | "Show spend by campaign for last week and compare with the week before" |
| Filters | filters:read, filters:write | Read: filter lists. Write: create a filter, attach it to a campaign and detach it, archive | "Create a blacklist of these zones and attach it to campaign 1041" |
| Selective coefficients | selective_coeffs:read, selective_coeffs:write | Read: coefficients and statistics by the campaign's zones. Write: set a zone coefficient, block or enable a zone, reset all coefficients, enable all zones | "Block zones with CTR below 0.2% over 7 days in campaign 1040" |
| Automation rules | bidder_rules:read, bidder_rules:write | View, create and change a rule, start and stop it | "Create a rule: block zones with CR below 1% after 300 clicks" |
| Audiences | audiences:read, audiences:write | View, create and change retargeting audiences | "Which audiences do I have?" |
| Pixels | pixels:read, pixels:write | View, create and change the pixels from Audiences → Pixels | "Show my pixels" |
| Postbacks | postbacks:read, postbacks:write | Read: events, integrations and tracker templates. Write: create, change and delete an integration | "Which postback integrations do I have?" |
What the assistant does not do: it does not work with the balance and payments, profile, password, notifications or API tokens, and it does not export reports to files. Do these in the dashboard.
Images and videos for creatives are uploaded with a separate HTTP request, not with an assistant command. If the assistant cannot upload a file, create the creative in the dashboard.
Permissions and security
- The assistant acts on behalf of your account. It sees and changes only what you can access in the dashboard and goes through the same checks as actions in the interface.
- Changes take effect immediately, as if you made them in the dashboard yourself.
- The assistant proposes the set of permissions. If it does not specify any, only read permissions are offered. You can grant only the permissions the assistant requested.
- The assistant receives dictionary names and validation error messages in the language selected in your account profile.
- The assistant renews its access automatically while it uses it. If the assistant has not contacted the platform for a long time, access can no longer be renewed: connect it again.
- Changing your password or signing out of the dashboard does not disconnect the assistant. To disconnect it, revoke access.
WARNING
With write permissions, the assistant can stop campaigns, change bids and delete postback integrations. Grant these permissions only if you are ready to check what it does. If the assistant asks you to confirm an action, read what exactly it is about to change.
How to revoke access
At the bottom of the left menu, open Settings and go to the Integrations tab.
In the OAuth applications block, find the assistant by name.
Click Delete and confirm in the Delete OAuth application? window.
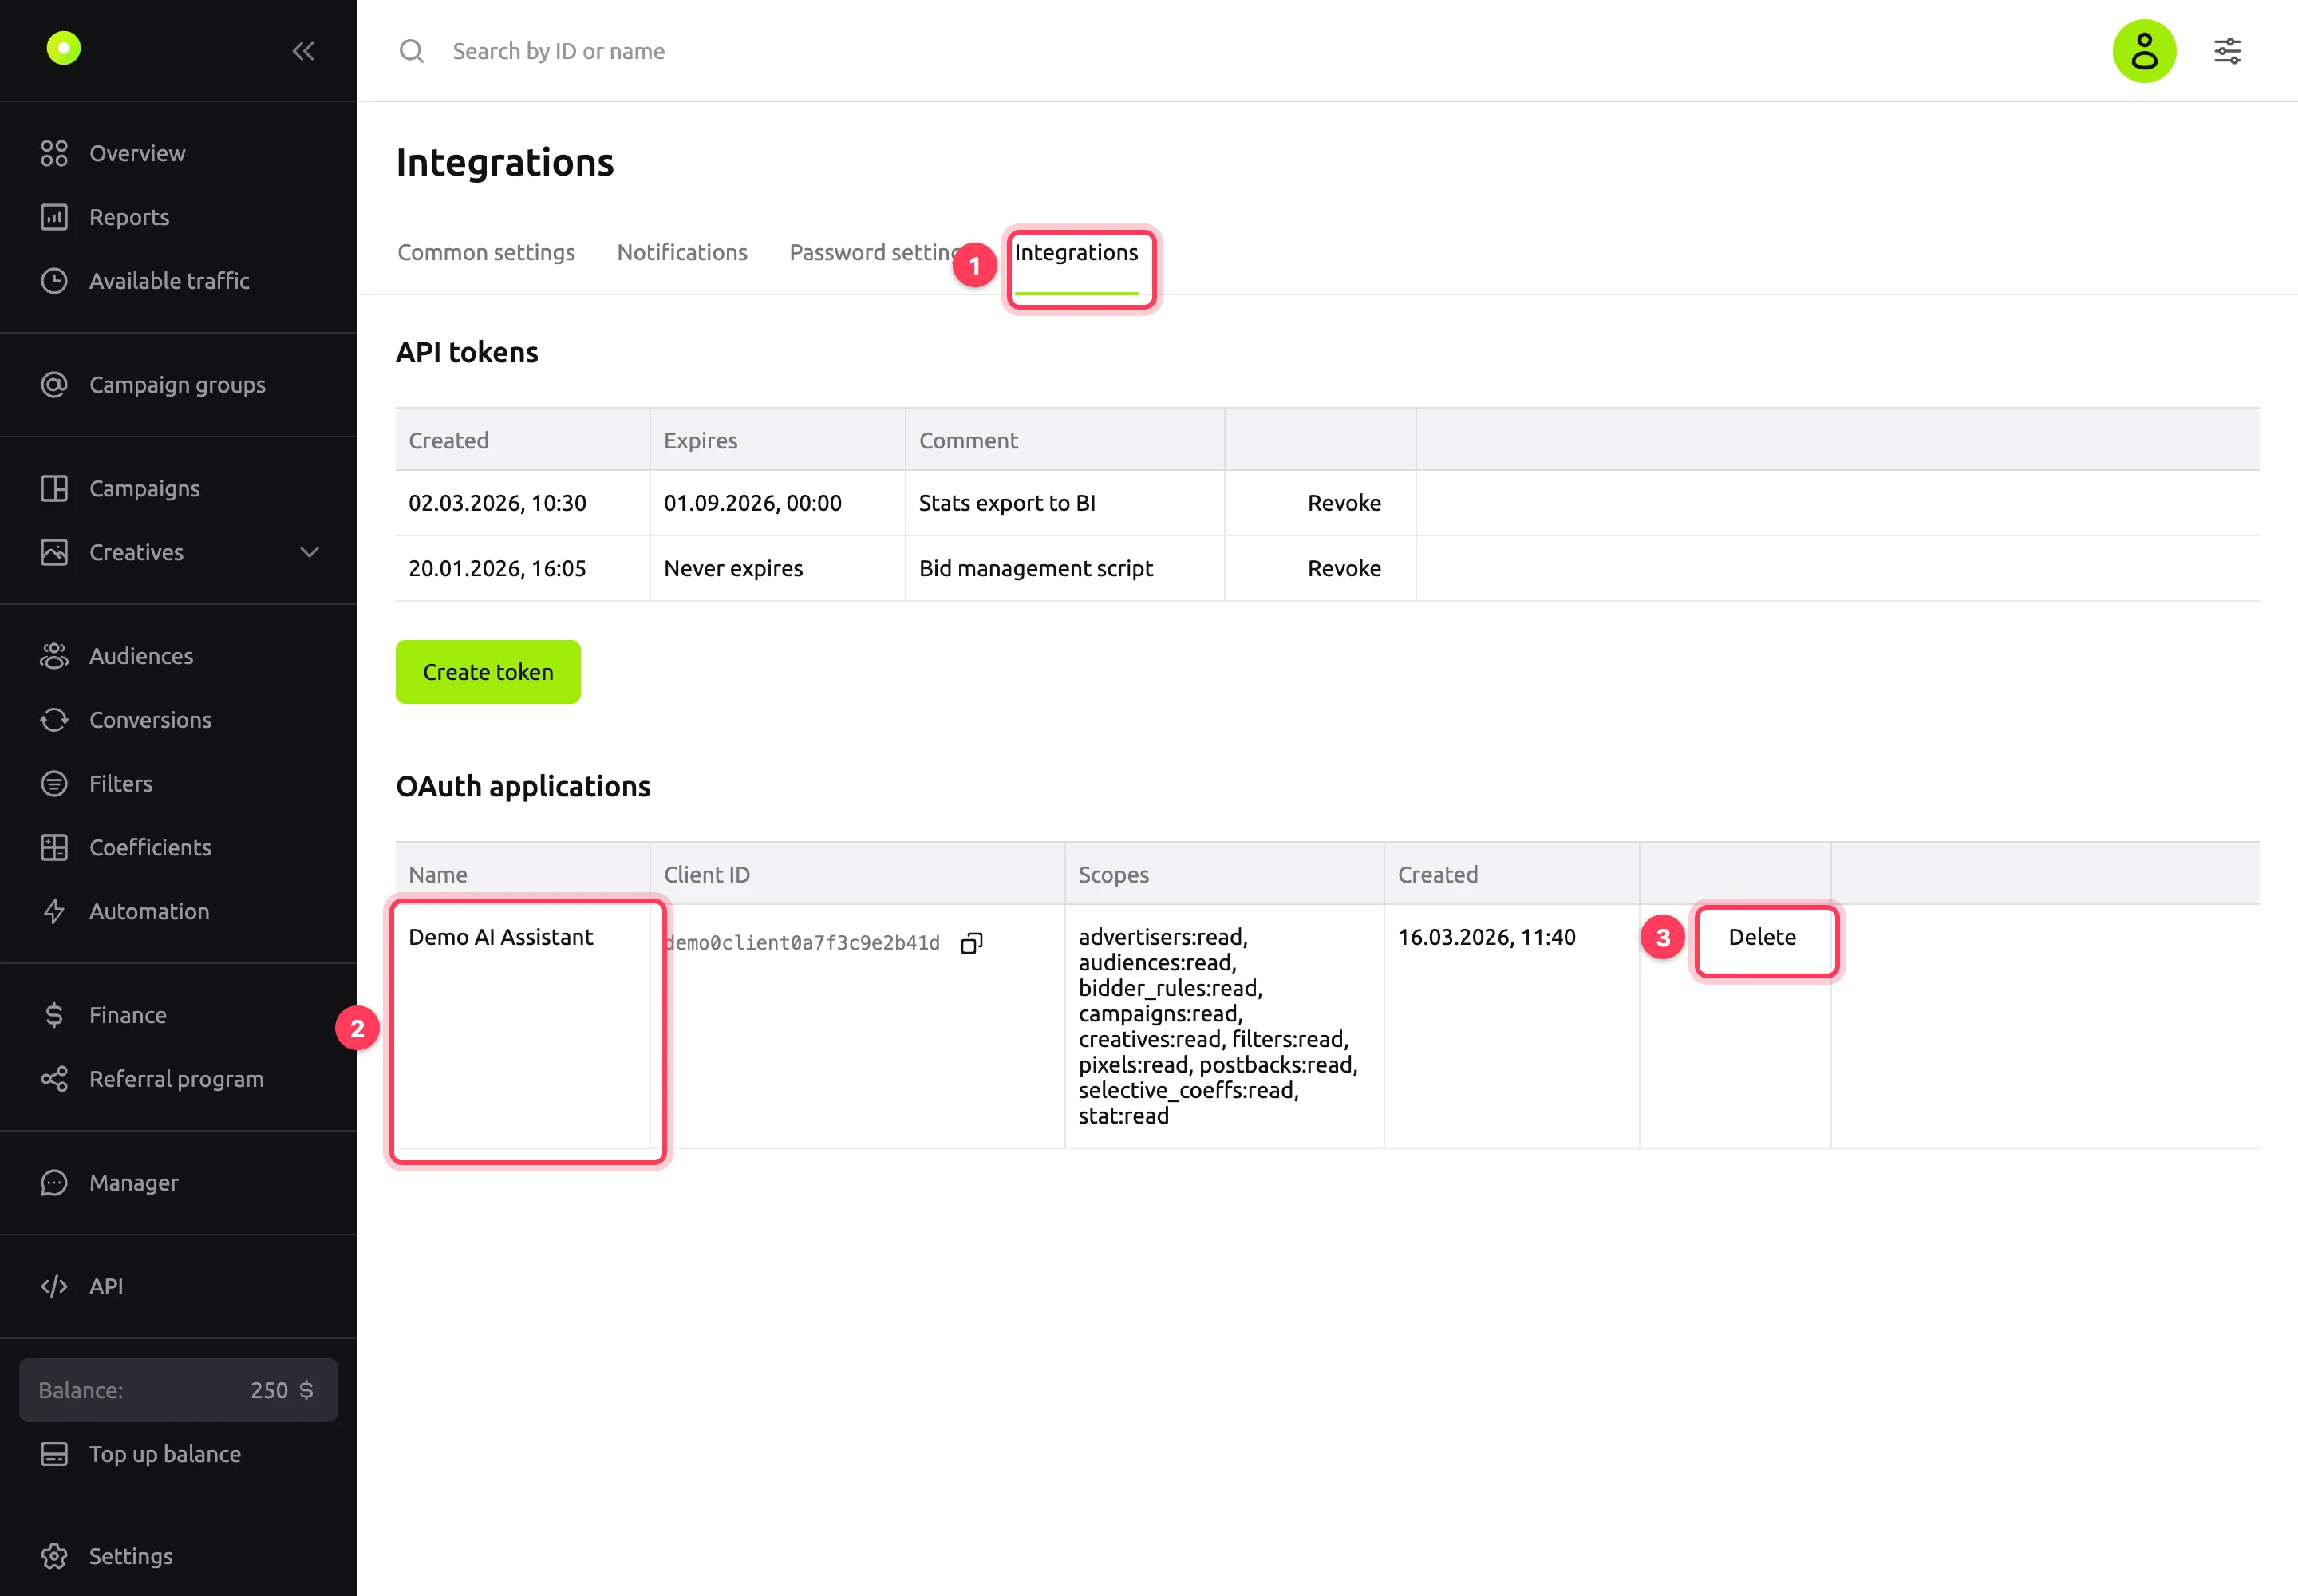
All tokens the assistant received for your account are revoked, and the assistant's next request fails. To restore access, connect the assistant again.
Revoke access if you no longer use the assistant or the list contains an application you did not connect.
Troubleshooting
| Symptom | Cause | Fix |
|---|---|---|
| "The authorization link is missing required parameters. Return to the app and start the connection flow again." | The page was opened with an incomplete link | Start the connection in the assistant again |
| "Authorization parameters are invalid or the application is not registered. Return to the app and try connecting again." | The assistant is not registered on the platform, or the link is outdated | Remove the server in the assistant's connector settings, add it again and connect |
| "The app sent an invalid connection request. Return to the app and start connecting again." | The assistant sent an incomplete or invalid request | Start the connection in the assistant again. If the error persists, remove the server in the assistant's connector settings and add it again |
| "This app is not allowed to connect to the cabinet." | The platform does not accept connections from this app | Remove the server in the assistant's connector settings and add it again. If the error persists, contact your manager |
| "The app requested permissions that the cabinet does not have." | The assistant requested permissions that do not exist on the platform | Check that the assistant uses the address https://advert-cabinet.youtarget.com/mcp/ and connect again |
| "The authorization service is temporarily unavailable. Try again later." | A temporary failure | Try connecting again later |
| The Allow button is disabled | All checkboxes are cleared | Select at least one permission |
The assistant reports Missing required scope 'campaigns:write' or another permission | This permission was not granted to the assistant | Revoke access and connect the assistant again with the permission selected. If the permission is not in the list, the assistant did not request it |
| The assistant cannot find a campaign or gets an access denied error | The assistant is connected to another account, or the account has no access to this object or action | Revoke access and connect again: check the account email on the Authorization request page. If an action is unavailable to you in the dashboard, it is unavailable to the assistant too |
The assistant reports Per-tool rate limit exceeded or Per-client rate limit exceeded | Too many requests in a short time | Ask the assistant to retry in a few seconds |
The assistant reports Invalid or expired access token or asks you to connect again | Access was revoked or expired | Connect the assistant again |
registration limit reached; retry in an hour when adding the server | Too many connection attempts in a row | Try again in an hour |
| Claude does not connect to the platform, and Use Claude's published identity is selected in the connector settings | The platform does not support this option | Delete the connector and add it again with Register automatically, see Claude |
| ChatGPT has no Add custom MCP server item | Your plan does not include custom MCP servers, or a workspace admin turned them off | Check your plan in the ChatGPT help or ask your admin |
Cursor does not connect: redirect_uri "cursor://…" must use https or http (localhost only) | Cursor returns authorization to a cursor://… address, and the platform does not accept such addresses yet | Connect the platform through VS Code, Claude Code or Codex |
Next steps
- Use the API: your own scripts and integrations without an assistant.
- Build a report with nested groupings: which groupings and metrics statistics offers.
- Reports: the metrics reference.
- Raise or lower the bid on specific placements.
- Set up automation rules: let the platform block weak zones on its own, without asking the assistant.