
Set up postback and conversion tracking
Goal
Send conversions from your tracker to the platform. Then you see purchases and leads next to your spend and can optimize the campaign by cost per conversion.
Before you start
- A tracker that can send a postbackA server notification about a conversion that a tracker sends to the platform., for example Keitaro or Binom. Your own server also works.
- A campaign with the
{click_id}macro in the Target URL or in the creative link. The Available macros button under the field opens the list of macros. The platform puts the click ID into this macro, the tracker stores it and returns it in the postback. Without{click_id}, a conversion cannot be linked to a click.
Steps
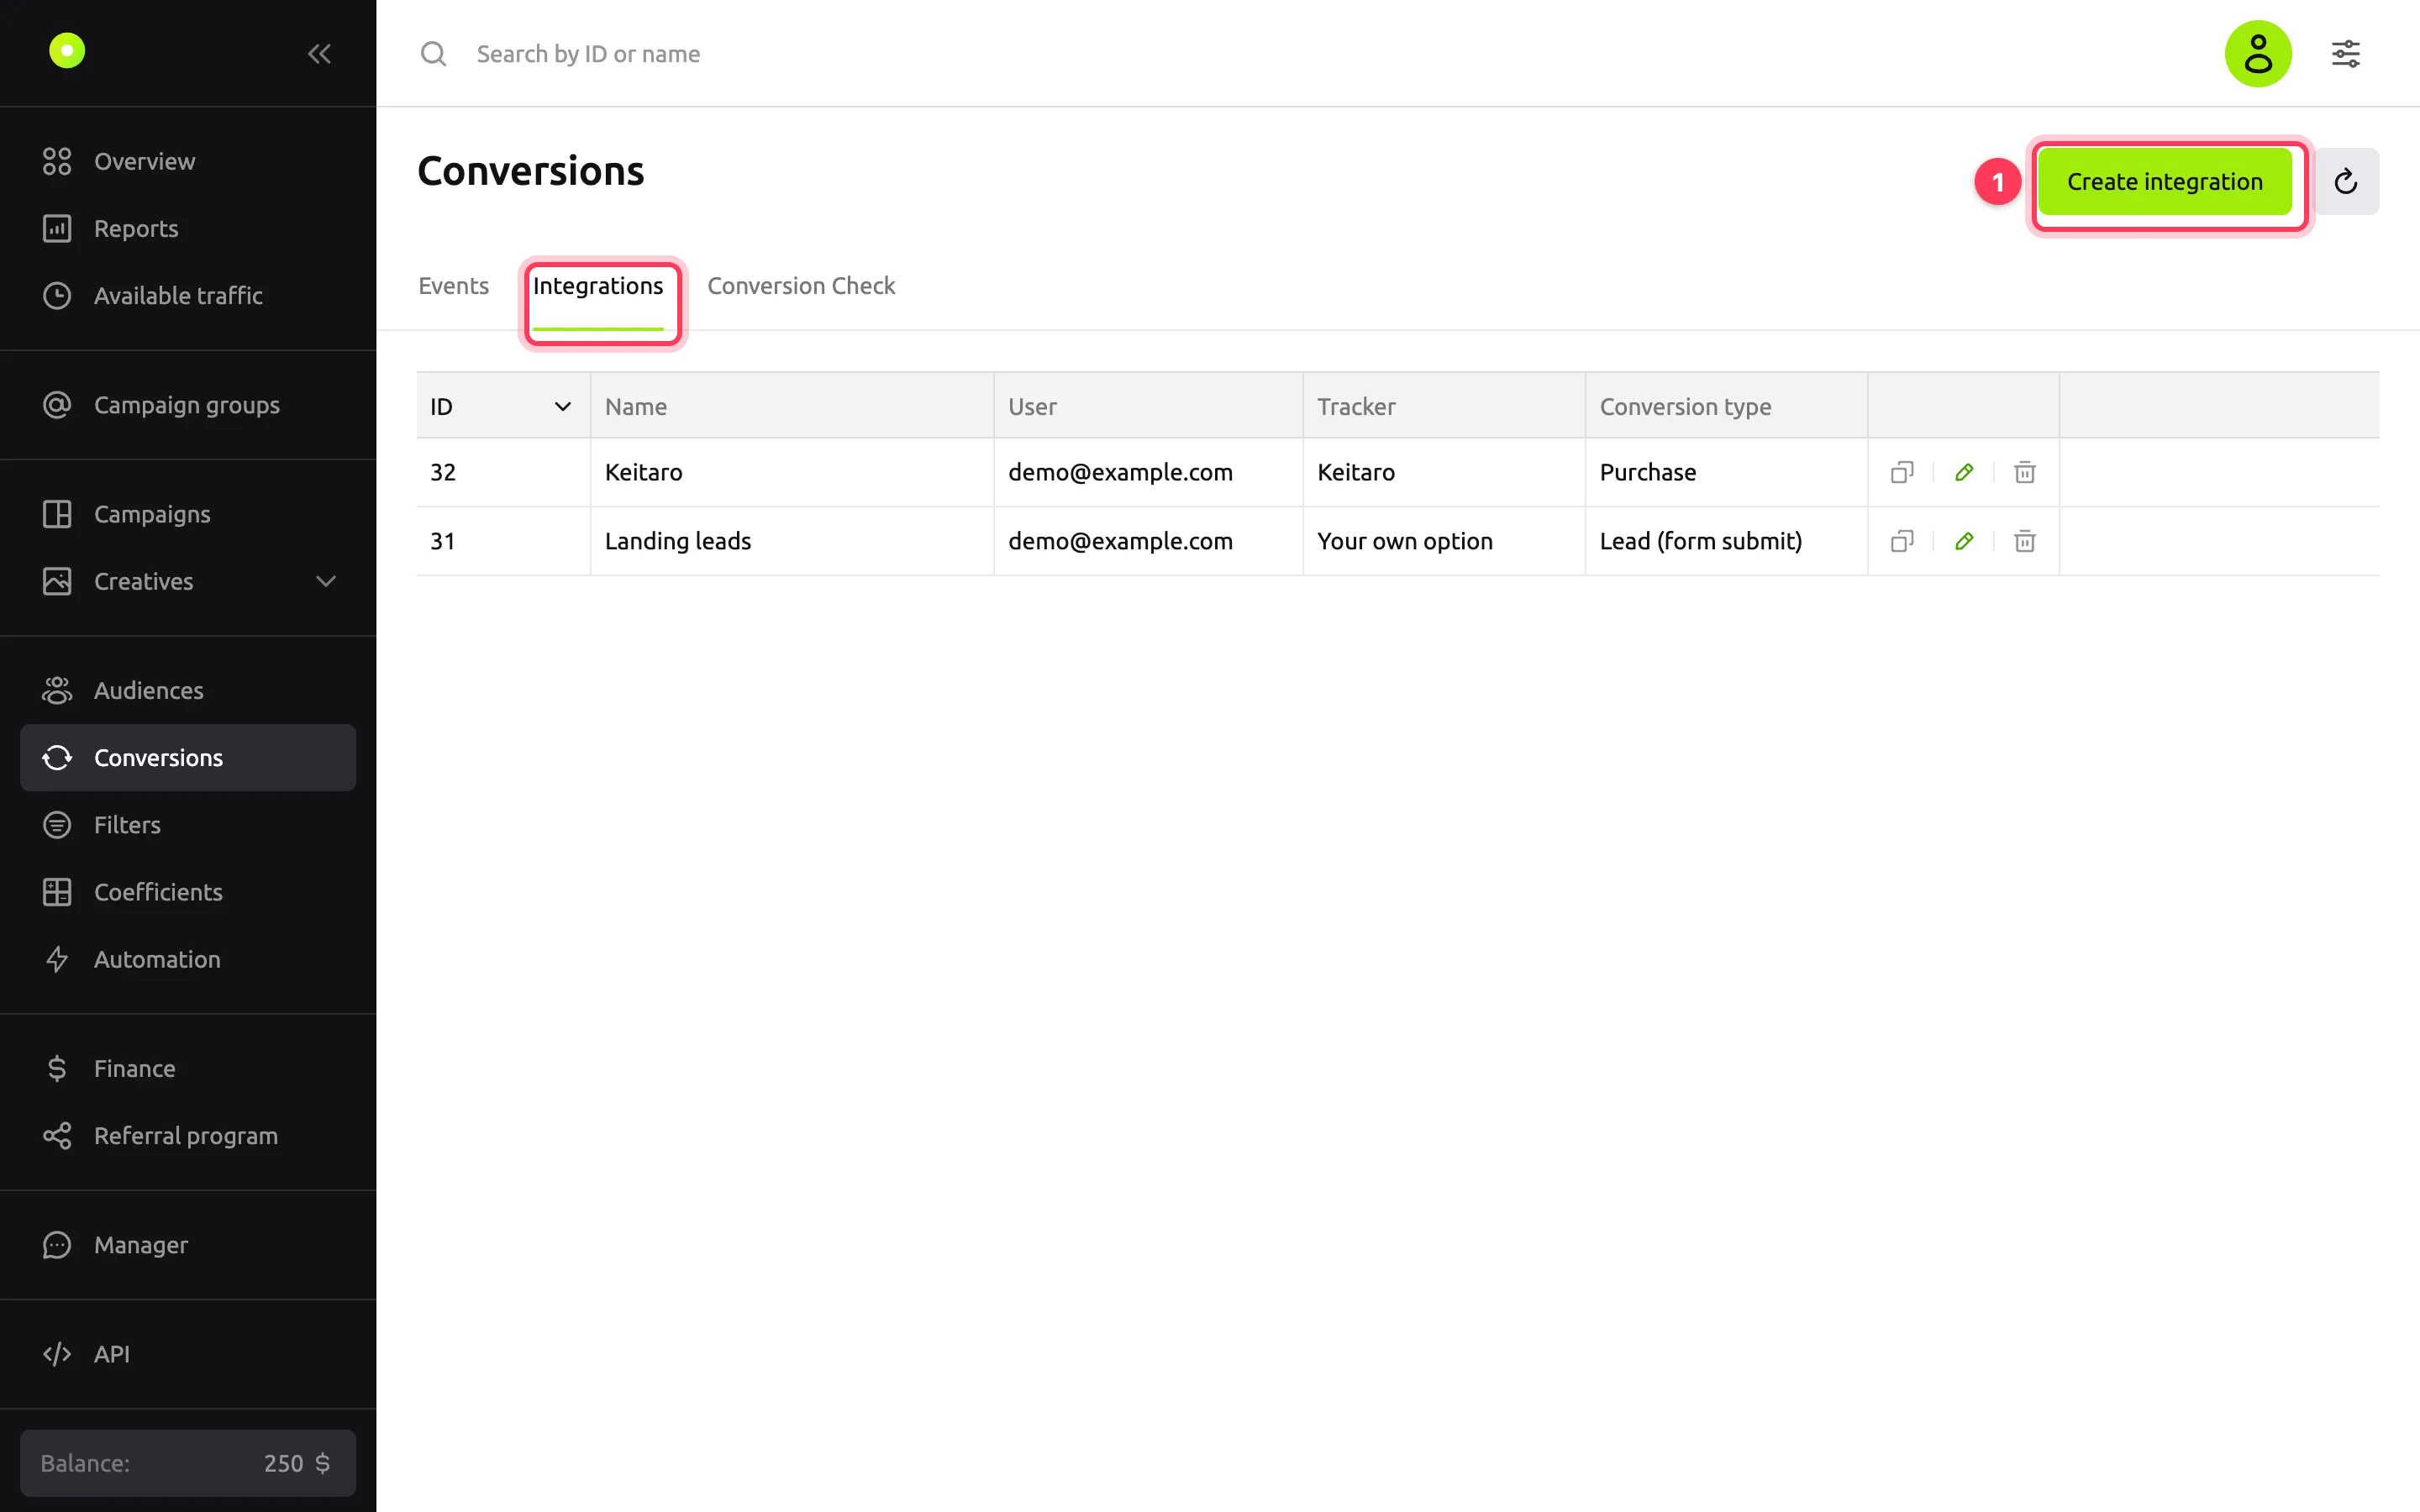
In the left menu, open Conversions, go to the Integrations tab and click Create integration.
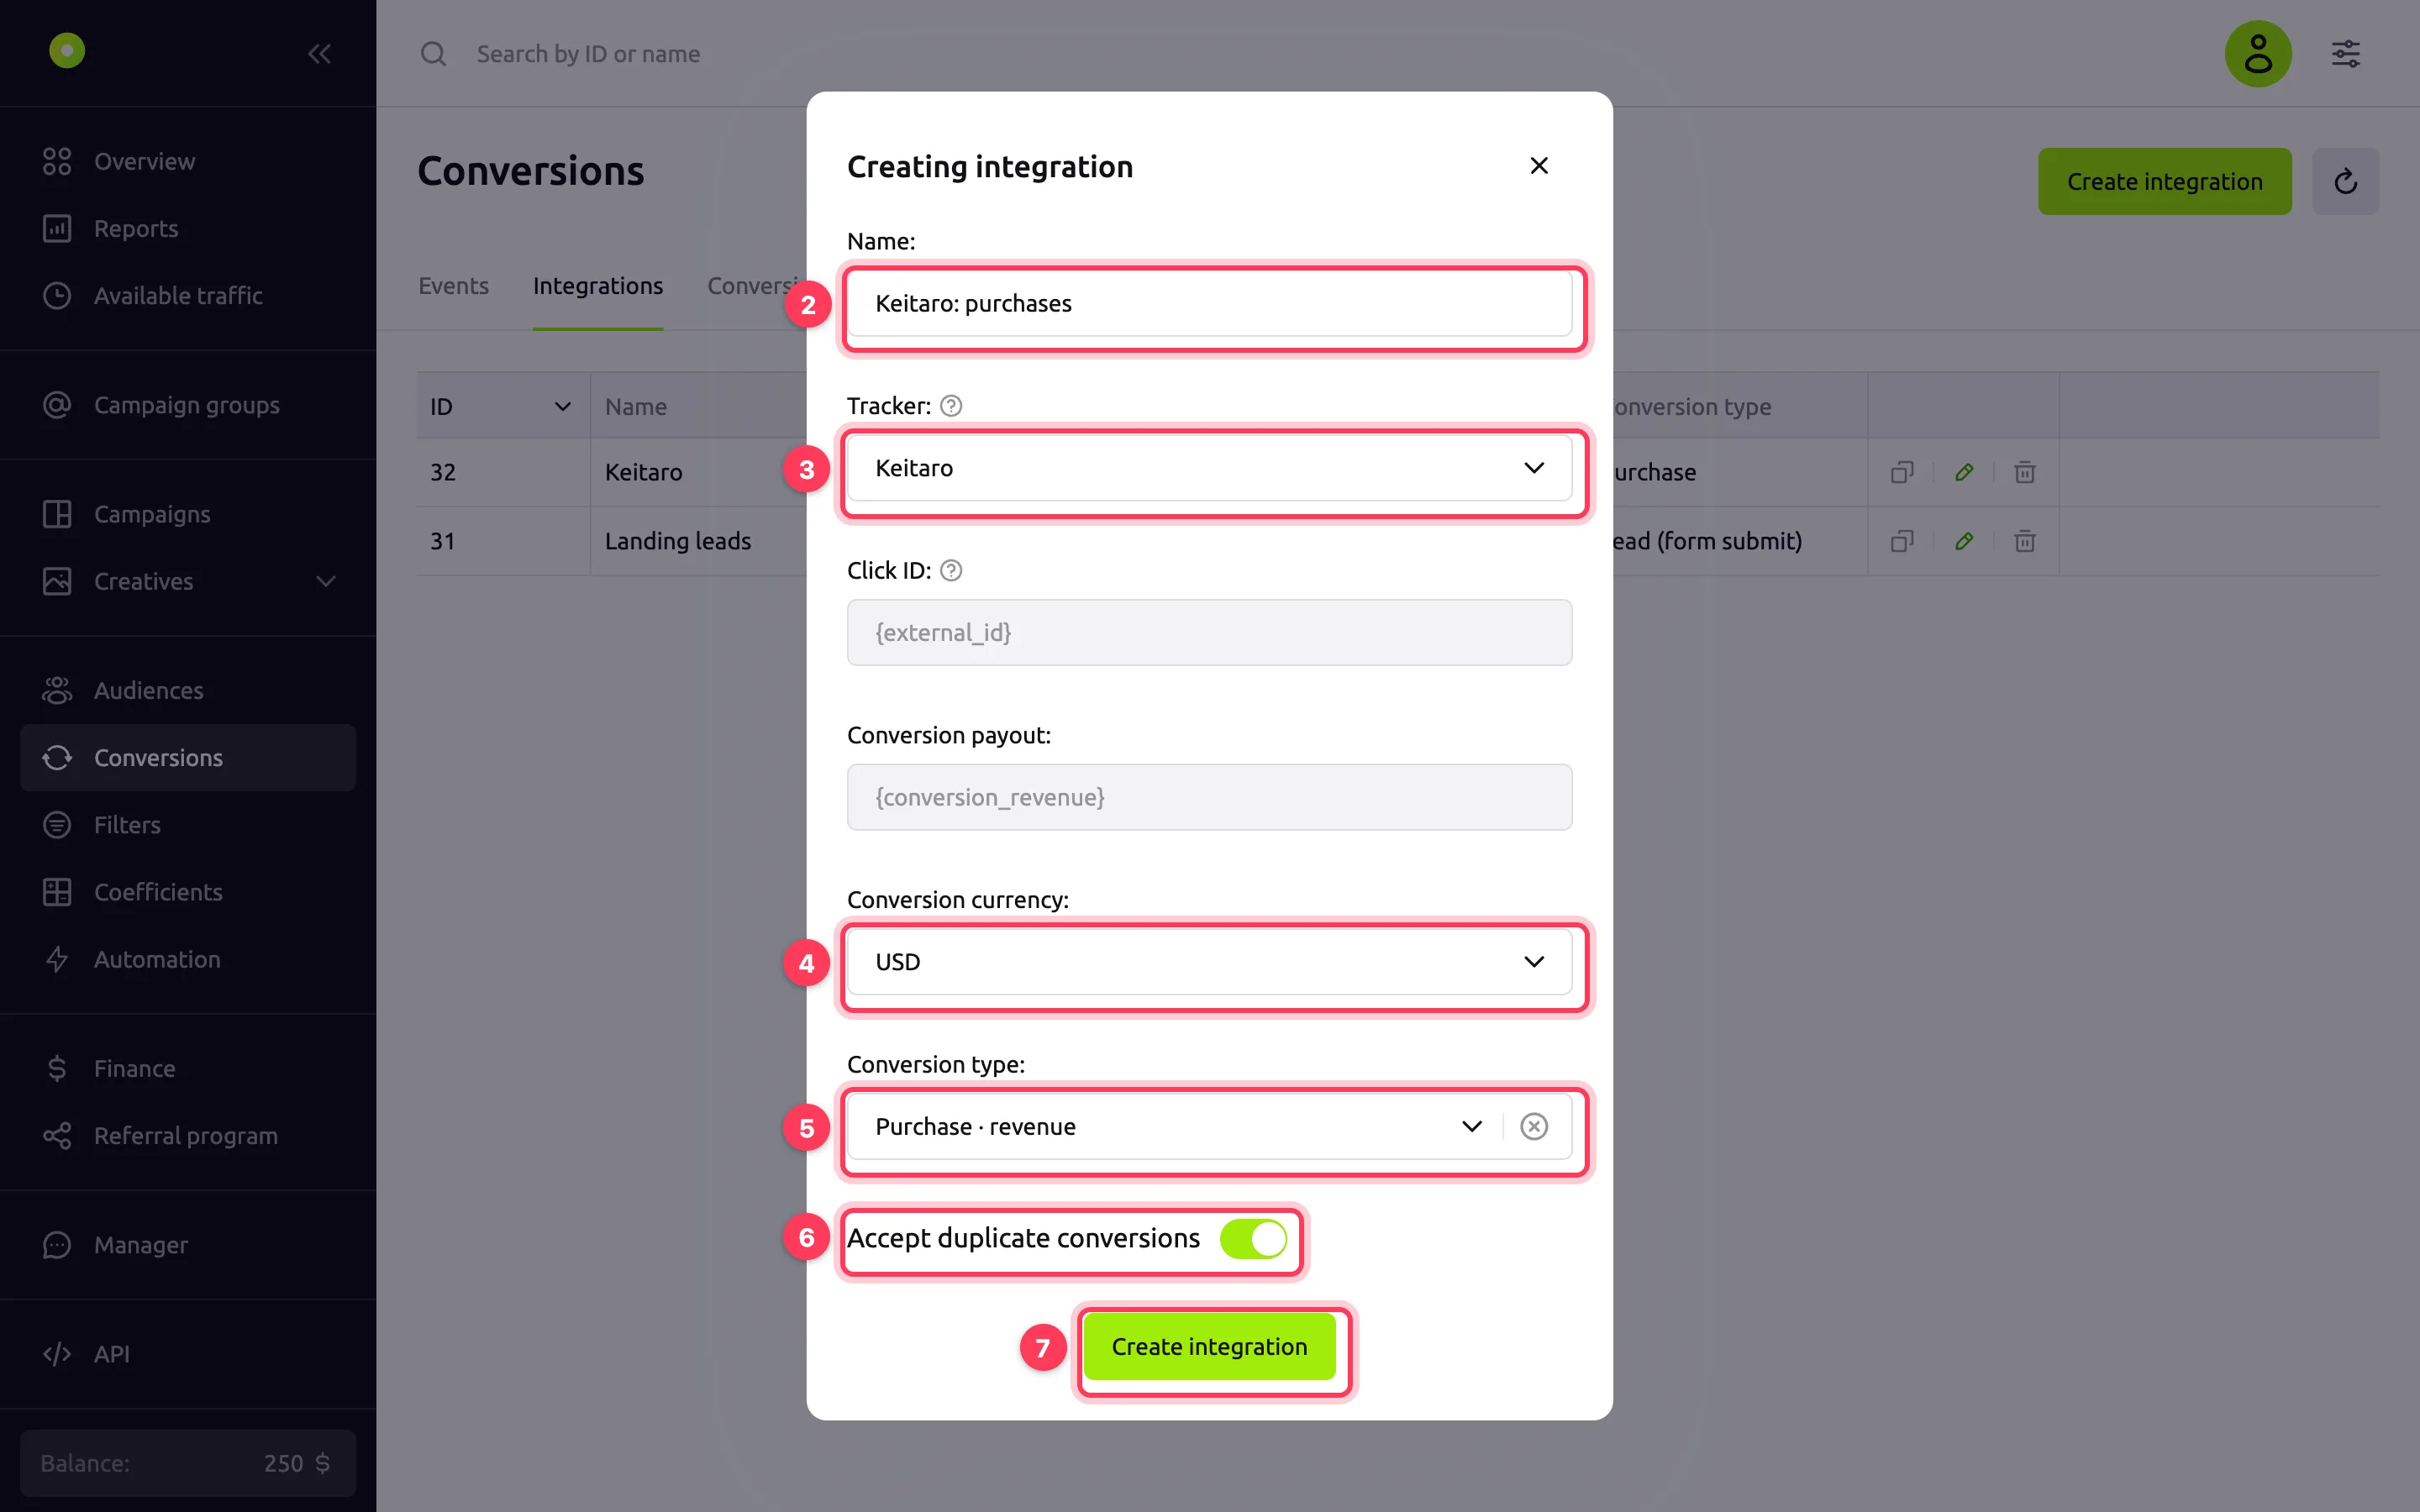
In the Tracker field, select your tracker. The dashboard fills Click ID and Conversion payout with this tracker's macros. While a tracker from the list is selected, you cannot edit these fields. If your tracker is not in the list, select Your own option and enter the macros manually, up to 20 characters each.
In the Name field, check or change the integration name. The name is filled in automatically when you select a tracker. Up to 20 characters.
In the Conversion currency field, select USD or RUB: the currency in which the tracker sends the payout.
In the Conversion type field, select the event, for example Purchase or Lead (form submit). The field is optional, but it makes conversions easier to tell apart in statistics.
Decide whether to turn on Accept duplicate conversions. It is on by default. If you turn it off, the platform counts only the first conversion per click and event type.
Click Create integration.
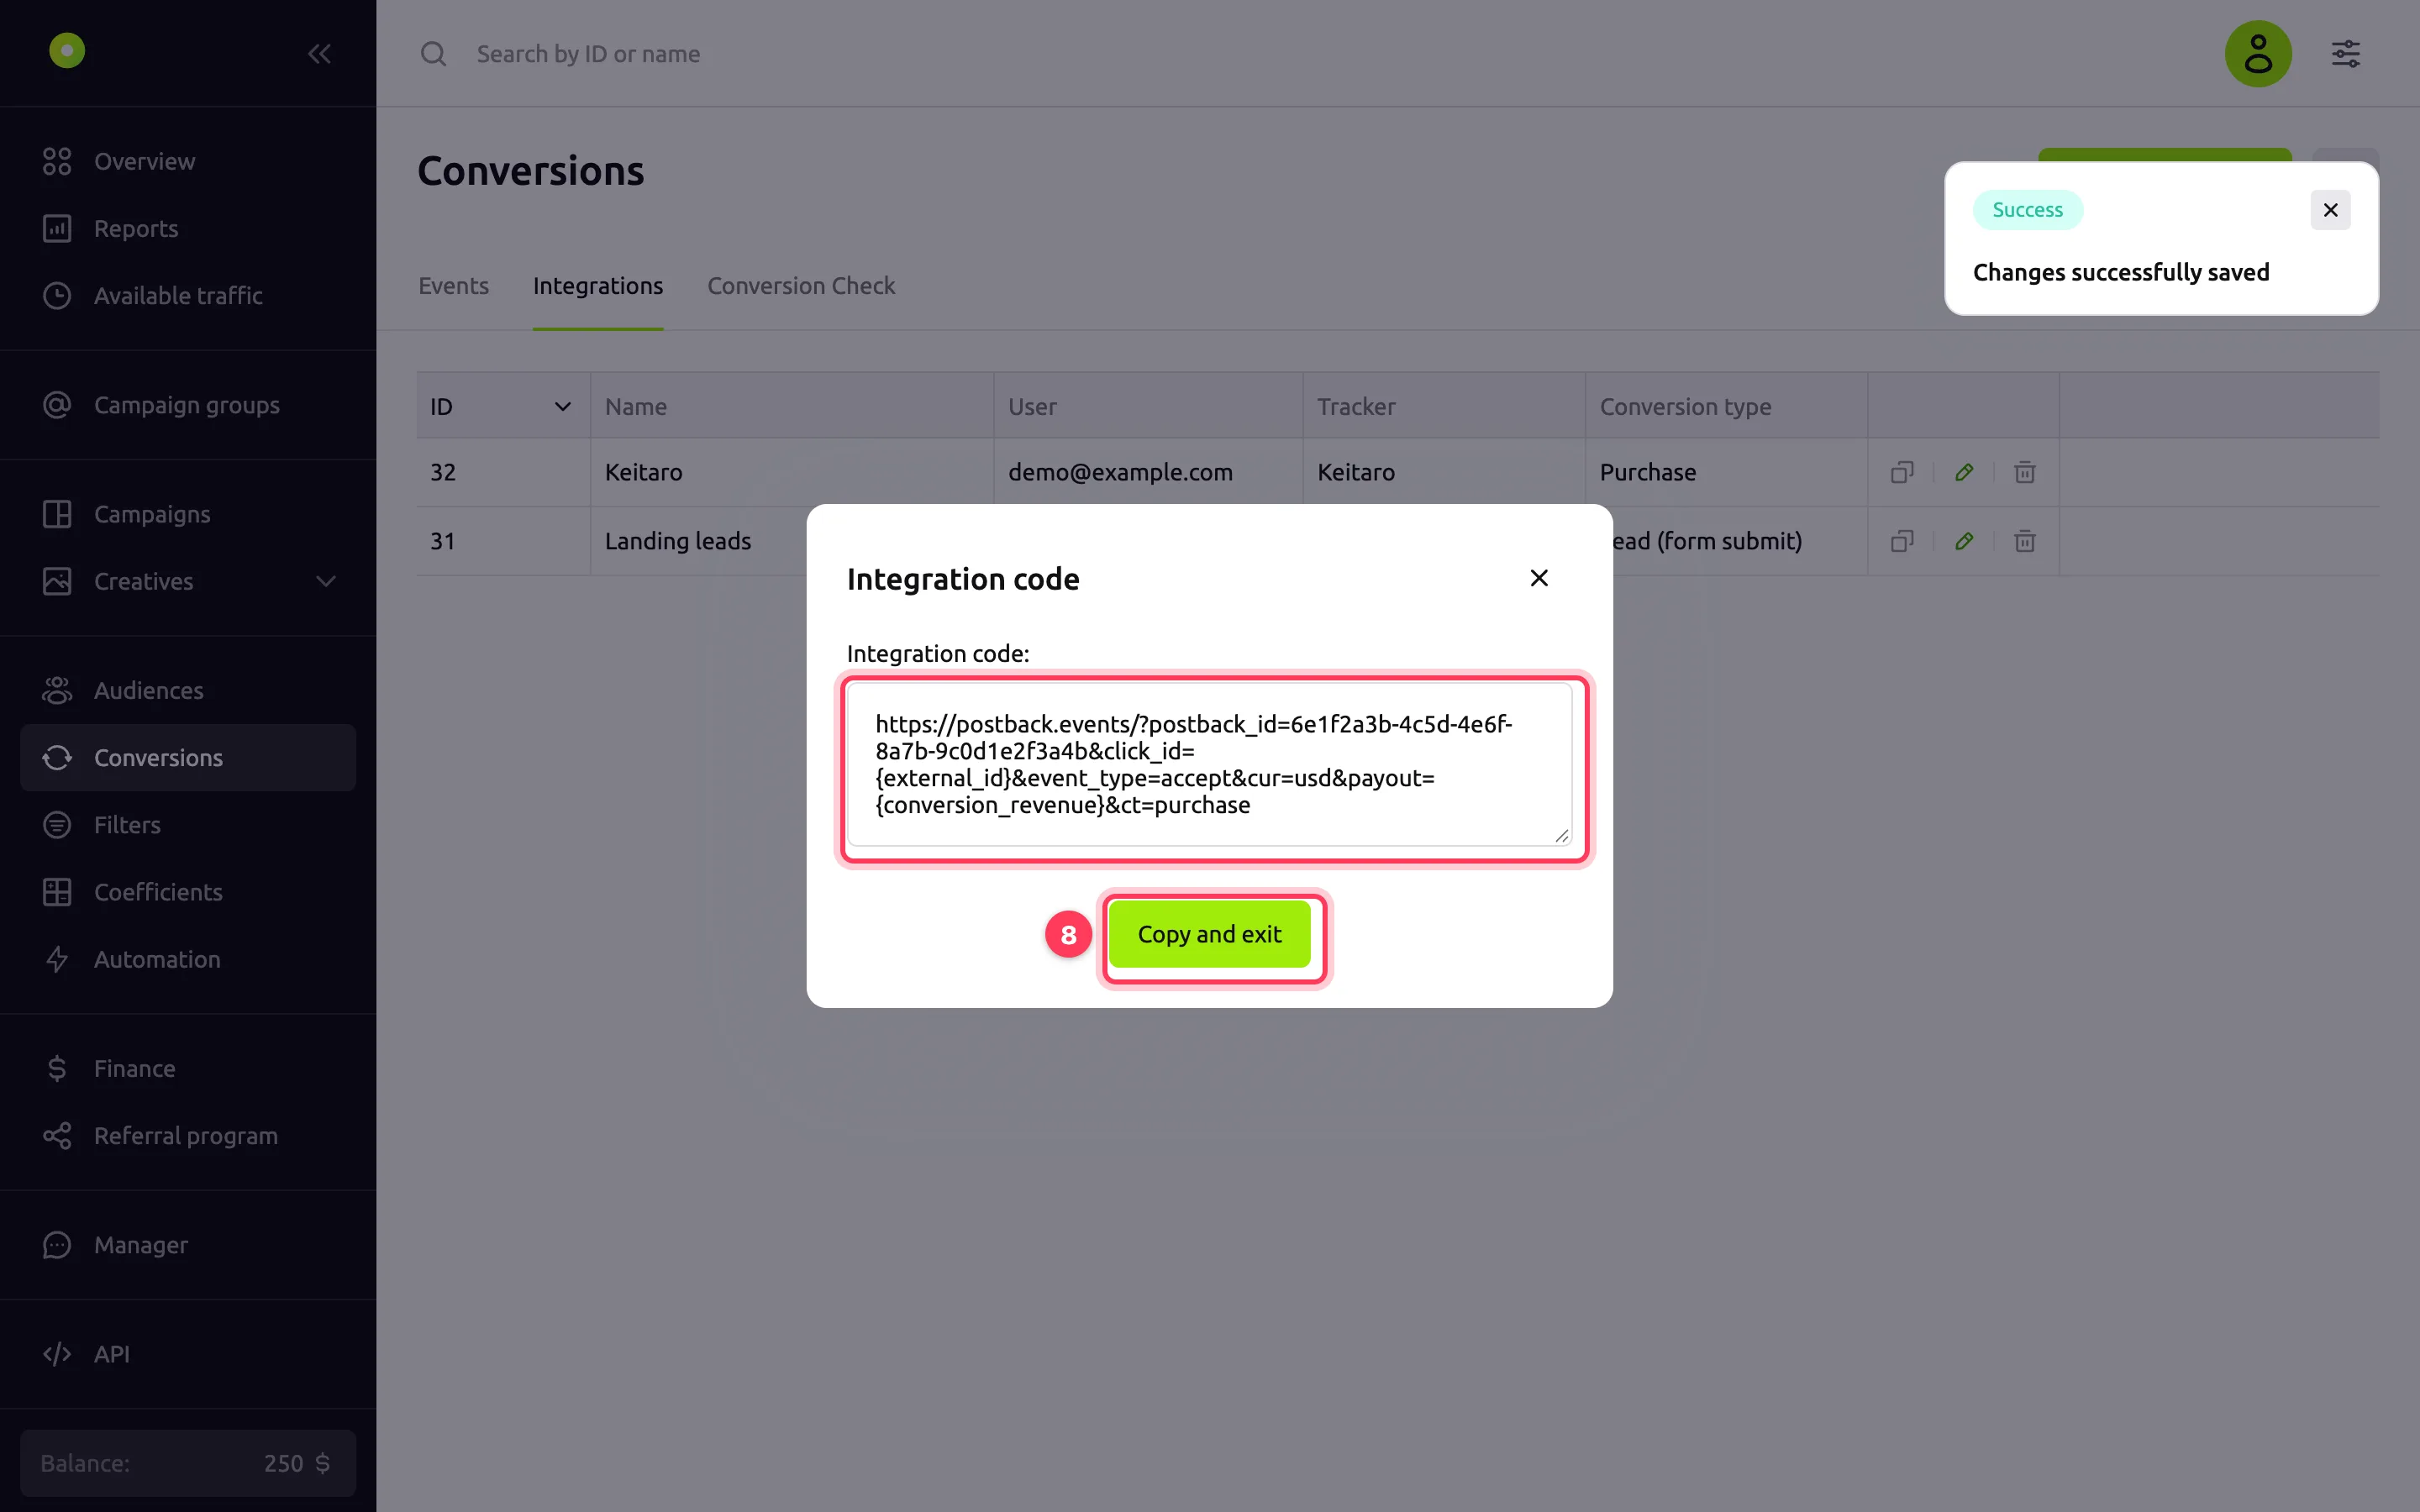
In the Integration code window, click Copy and exit. The link is copied to the clipboard.
In your tracker, paste the link into the postback settings for the Youtarget traffic source.
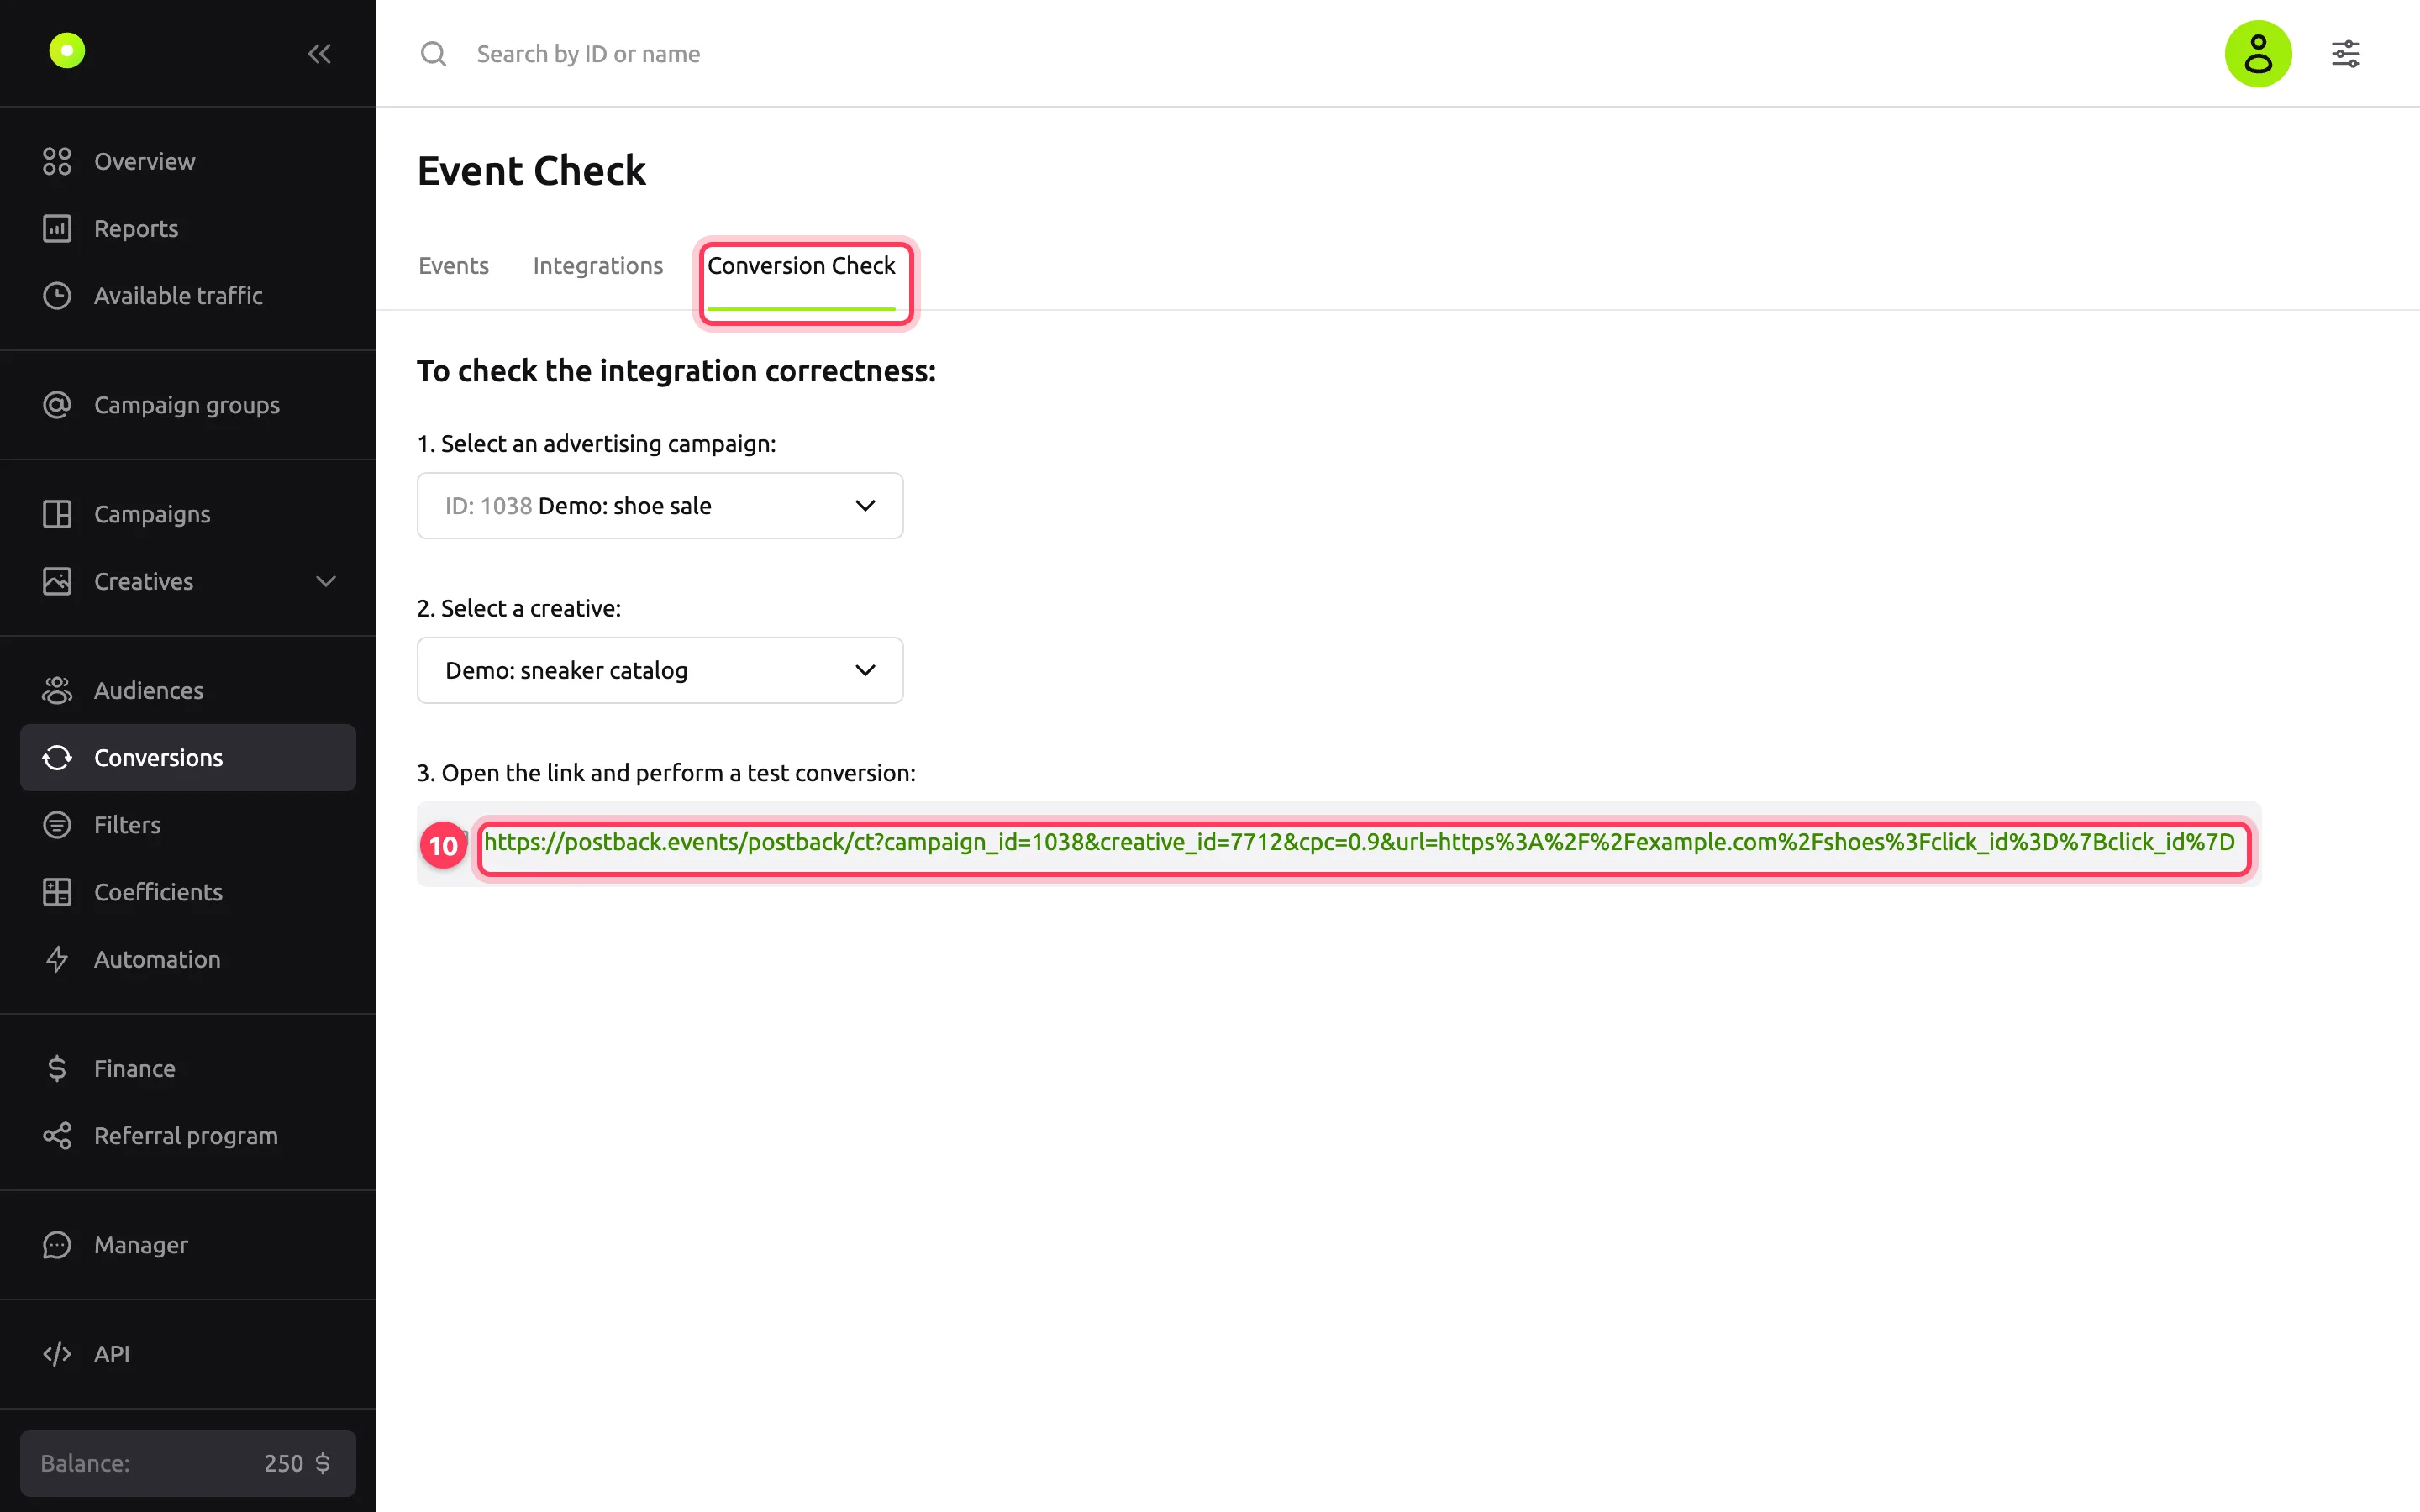
Test the integration: on the Conversion Check tab, select a campaign and a creative, open the generated link and complete the target action on the site, for example submit a test lead form.
Integration fields
| Field | What it means |
|---|---|
| Tracker | The tracker that sends conversions. The dashboard fills Click ID and Conversion payout with this tracker's macros, and while a tracker from the list is selected, these fields cannot be edited. If your tracker is not in the list, select Your own option and enter the macros manually. Binom and Keitaro have separate guides: Binom, Keitaro |
| Click ID | The tracker macro that passes the click ID (click_id). The dashboard uses it to match the conversion with the click. For Your own option, up to 20 characters |
| Conversion payout | The tracker macro with the conversion payout. For Your own option, up to 20 characters |
Result
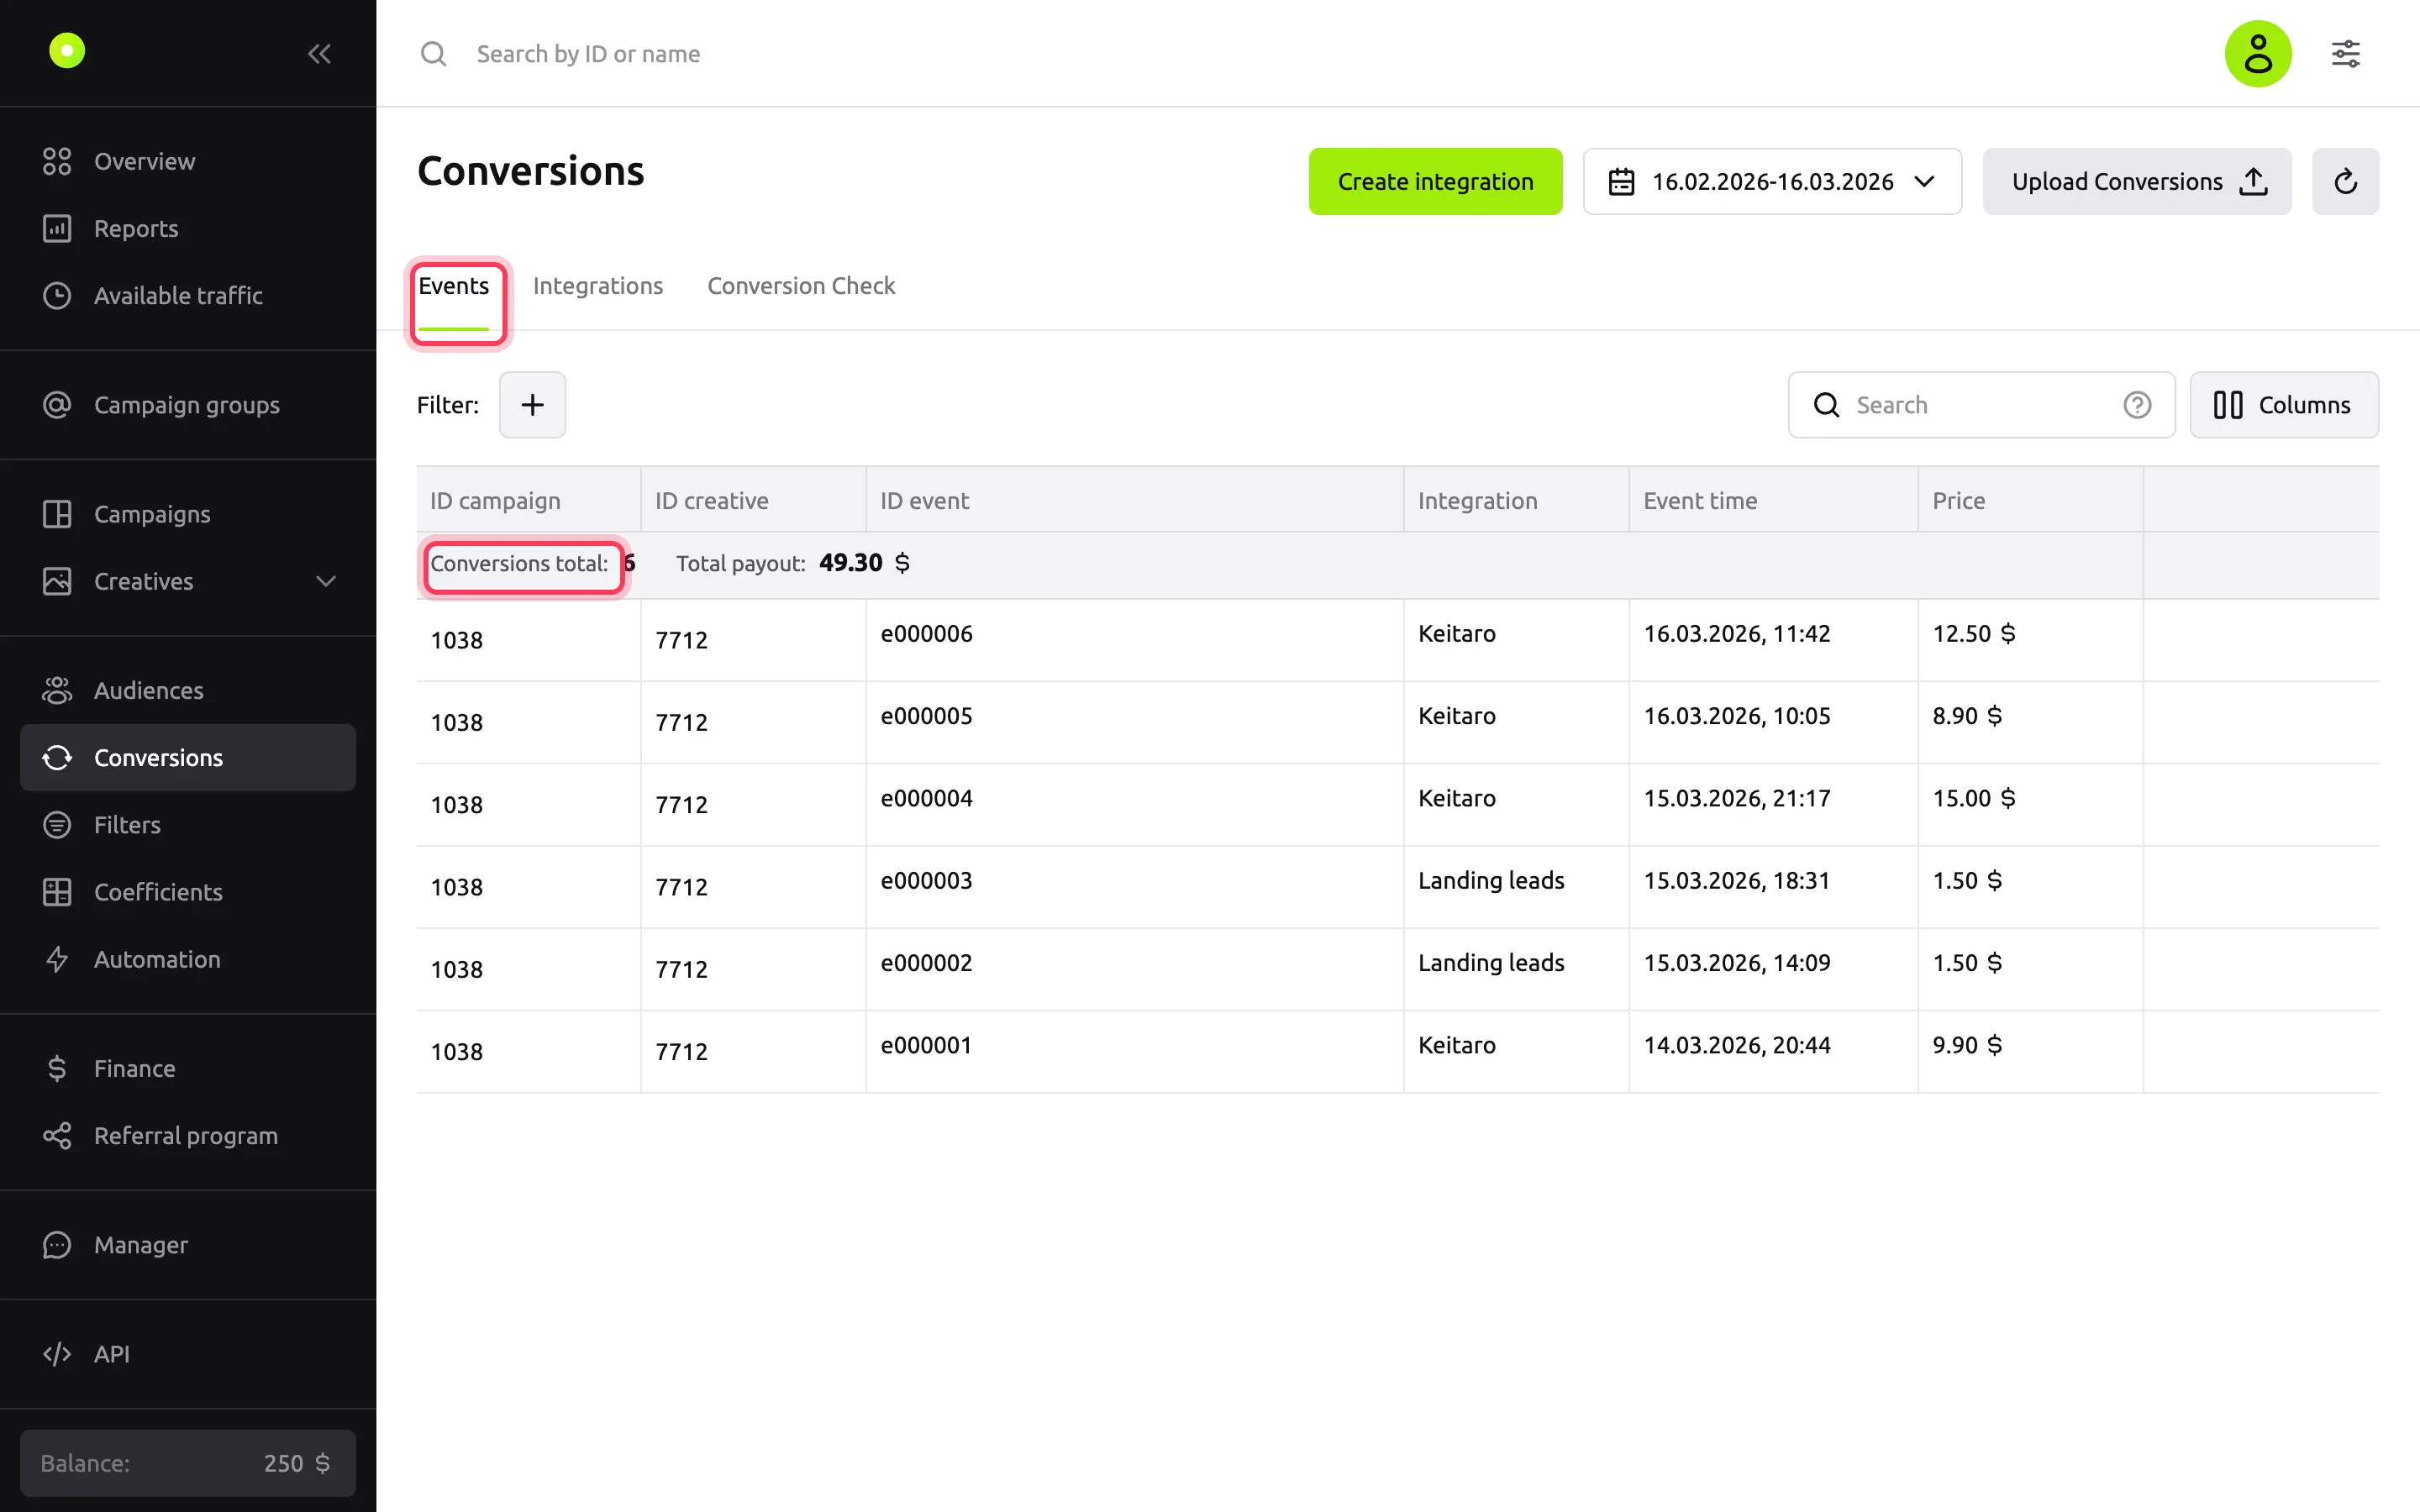
Conversions appear on the Events tab: campaign, creative, integration, event time and payout. Above the table you see Conversions total and Total payout for the selected period.
The postback link looks like this. The tracker replaces the click_id and payout values with its own:
https://postback.events/?postback_id=<integration id>&click_id=<tracker macro>&event_type=accept&cur=usd&payout=<tracker macro>&ct=purchaseNOTE
The platform counts every conversion it receives as approved. Set up your tracker to send the postback only for approved conversions. For details, see Conversions are not coming in.
Manage integrations
Each integration row on the Integrations tab has three icons:
- Copy: opens the Integration code window with the postback link again.
- Pencil: opens the Editing integration window.
- Trash can: deletes the integration after you confirm it in the Confirm deletion window. You cannot undo the deletion.
After you click Edit integration, the dashboard shows the Integration code window again. The currency and conversion type are written into the link itself, so after an edit, copy the new link and replace the old one in the tracker.
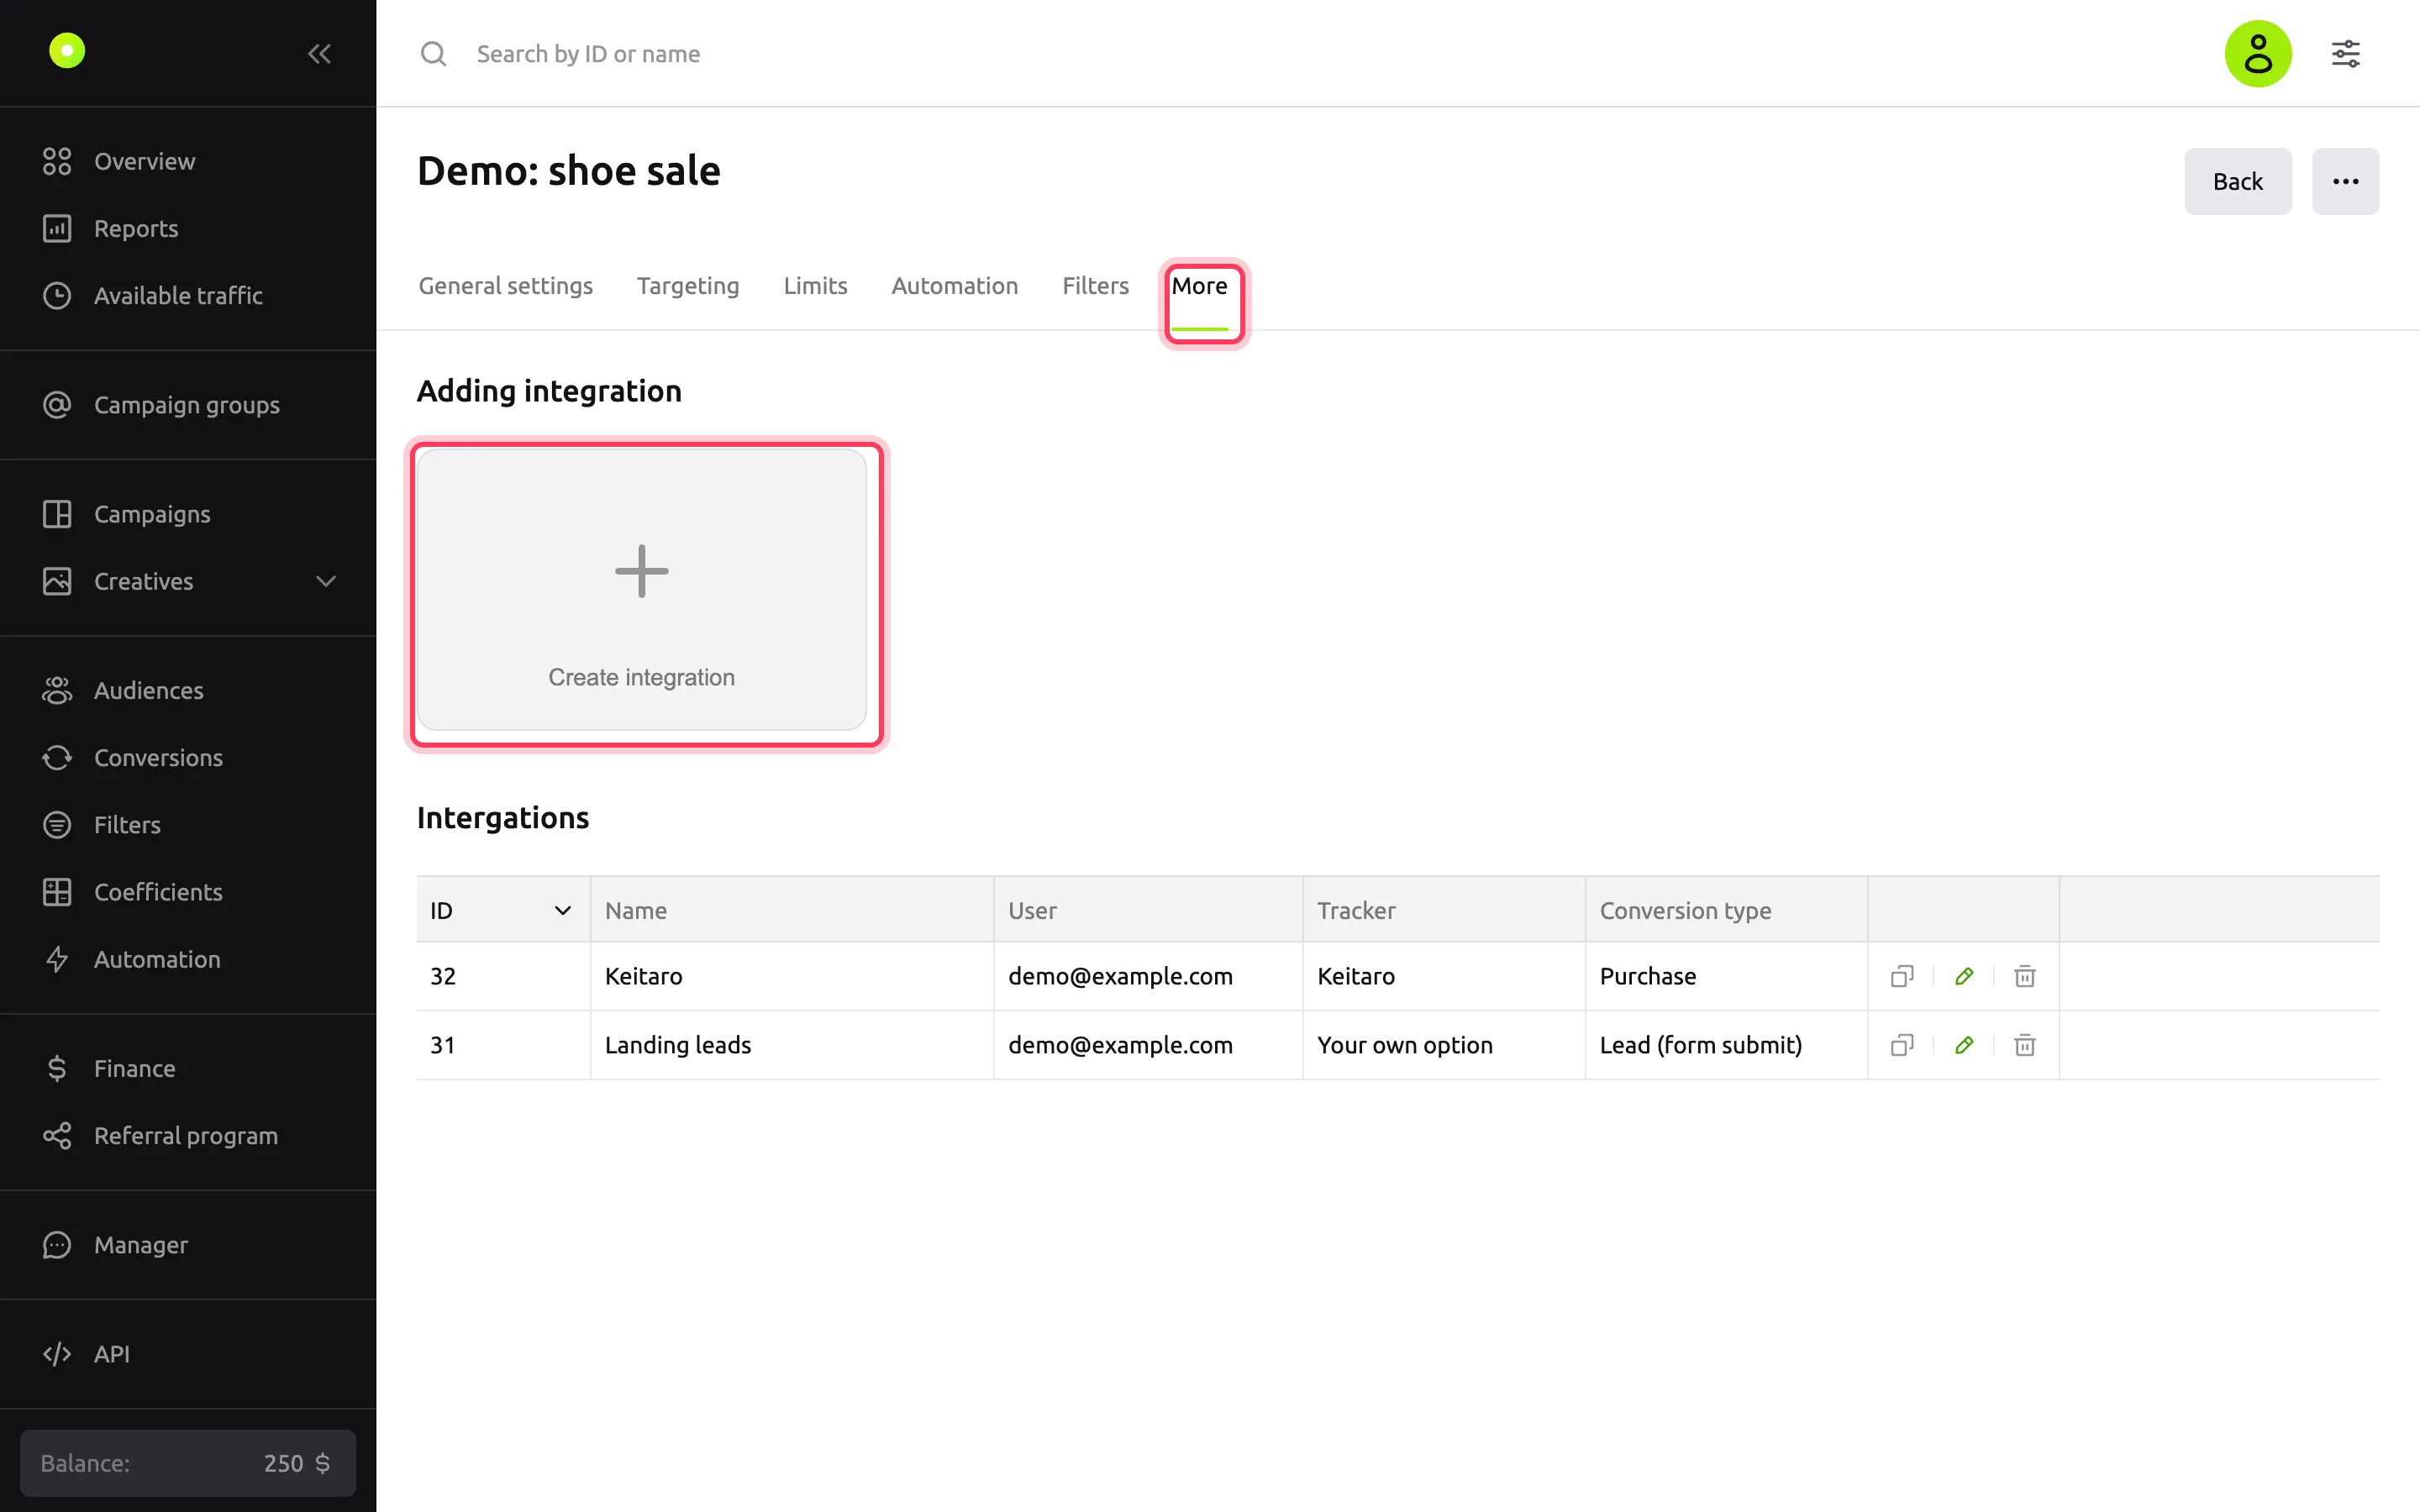
The same integrations are available in the campaign settings, on the Conversions tab: the Create integration button in the Adding integration block and the list in the Intergations block. If you do not see the tab in the row, open the More menu. An integration is not tied to a campaign: one postback link accepts conversions from all your campaigns, and the platform finds the campaign by click_id.
Troubleshooting
| Symptom | Cause | Fix |
|---|---|---|
| "Please check the correctness of the entered data" when you create an integration, and fields are highlighted | No tracker or currency is selected | Select a Tracker (or Your own option) and a Conversion currency |
| The integration is not saved after you enter the name or macros | The name or a macro is longer than 20 characters | Shorten the value to 20 characters |
| Conversions do not appear on the Events tab | The campaign or creative link has no {click_id}, or the tracker does not send the postback | Add {click_id} to the Target URL. In the tracker, check that the postback for the source is on and the link is pasted in full. For details, see Conversions are not coming in |
| A conversion was not counted although the tracker sent it | The tracker returned the wrong click_id (changed or truncated it), or the conversion arrived more than 60 days after the click | Check that the tracker returns the click_id from the link unchanged. For the list of values, see the Macros reference |
| Fewer conversions than in the tracker | Accept duplicate conversions is off, and the tracker sends repeated events for the same click | Turn it on in the integration settings if you need repeated conversions |
| Wrong conversion payout | The integration currency does not match the currency in which the tracker sends the payout | Edit the integration, select the correct Conversion currency and replace the link in the tracker |
Next steps
Optimize by CPA. In the campaign settings, in the Finances block, select CPA optimization and set the target value. For details, see Bid optimization. Turn on Receive conversion cost from postback so that the platform takes the conversion payout from the postback instead of the target value.
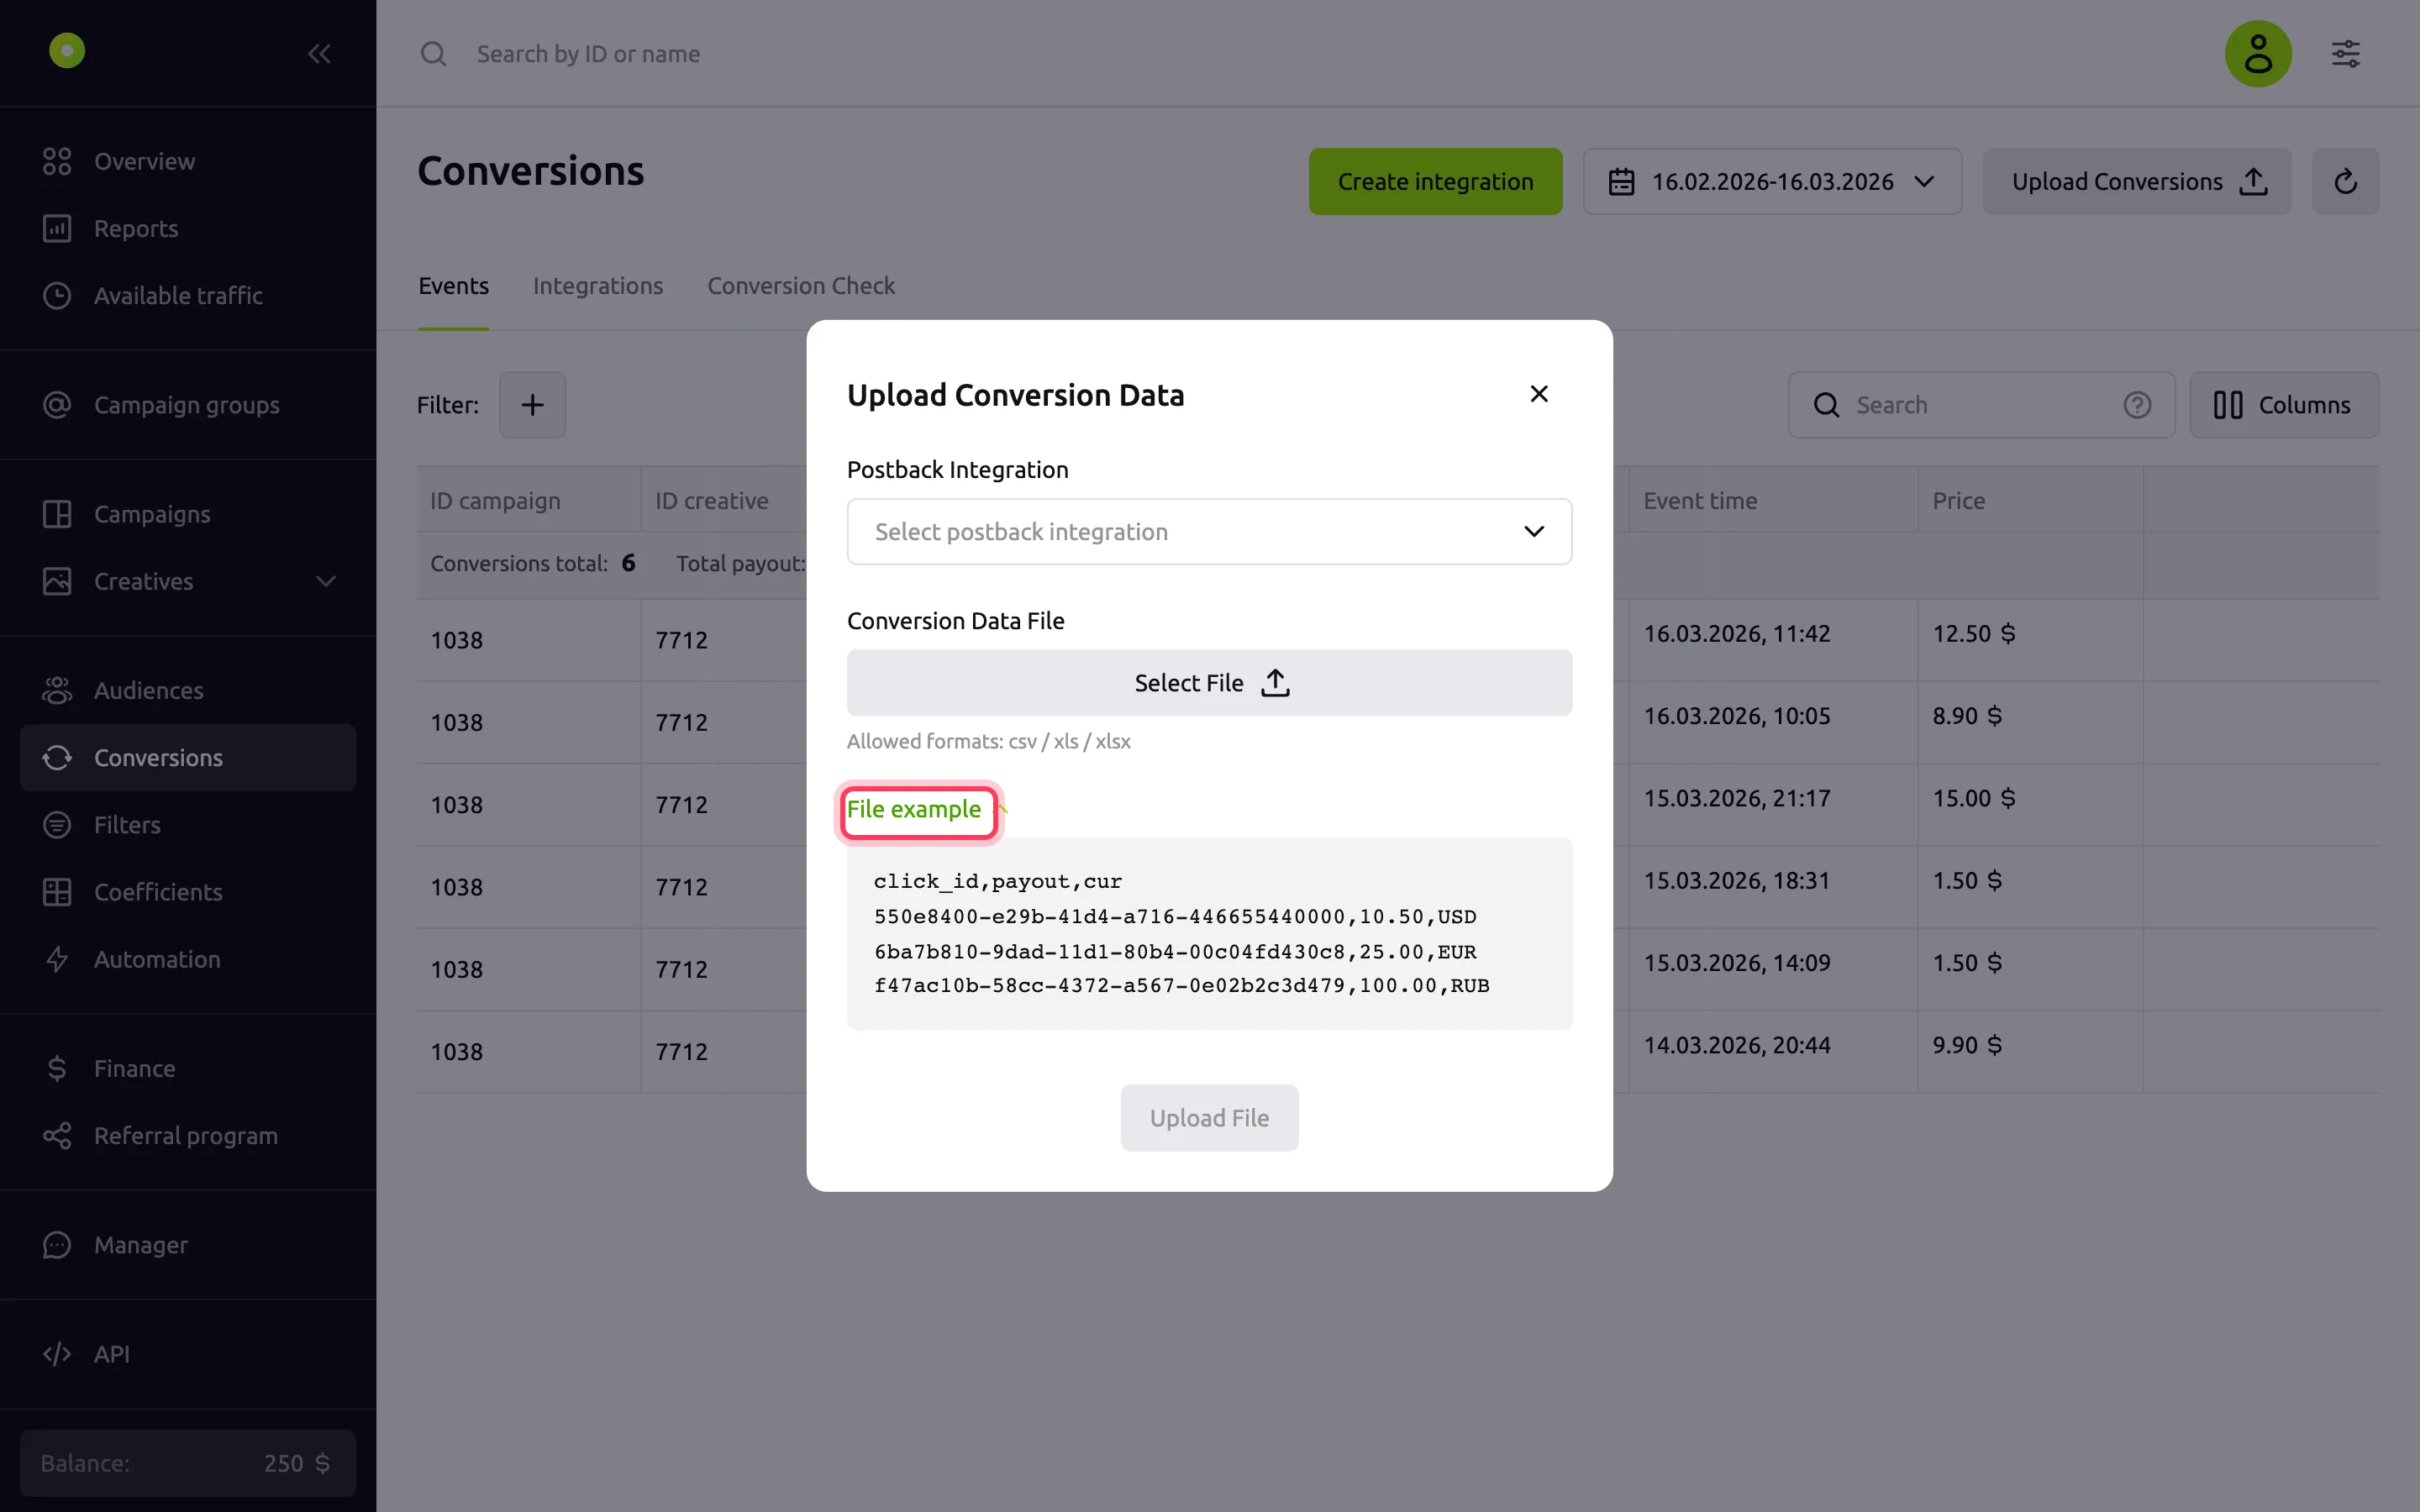
Upload conversions from a file. On the Events tab, click Upload Conversions, select the integration and a CSV, XLS or XLSX file with the
click_id,payoutandcurcolumns. The File example link in the same window shows a sample. File requirements:click_id: the click ID in UUID format, as the{click_id}macro passes it.payout: a number of zero or more, with a dot as the decimal separator:10.50.cur: a currency code, for exampleUSD.- No empty cells.
If even one row does not meet these requirements, the platform rejects the whole file. To fix upload errors, see Conversions are not coming in.
Build an audience of people who completed the target action and show them ads again: retargeting.